qgisgislocation-servicespythonmcp
Connects QGIS Desktop to Claude AI via MCP for project and layer management, processing, and code execution.
Quick Install
Automated & IDE SetupCopy the AI prompt to install this server into Claude Code, Cursor, or another agent — or use 1-click editor setup below.
One-click editor setup isn’t available for this listing yet — we don’t have a confirmed install command, and we’d rather show nothing than point your editor at the wrong package or host. Follow the project’s own setup instructions, linked above.
Manual Client & Custom JSON ConfigExpand JSON ▾
No confirmed setup config for this listing yet. We only publish a config block when the install details come from the project itself — its README, its docs, or a verified owner. We haven’t found those for QGIS MCP, and we’d rather show nothing than a guess you’d paste into your client. Follow the project’s own setup instructions for the current steps.
Overview
Use cases
Create and save new QGIS projects programmatically
Load and manipulate vector and raster layers in a project
Execute geospatial processing algorithms from AI prompts
Render map views to image files for visualization
Run custom PyQGIS code snippets within QGIS
Key features
Two-way socket communication between QGIS and Claude AI
Project creation, loading, saving, and info retrieval
Add, remove, and zoom to vector and raster layers
Execute QGIS Processing Toolbox algorithms
Render current map view to image files
Execute arbitrary Python code in QGIS
Capabilities & Tool Schemas (15)
Inspect callable tools, capabilities, and parameters exposed to AI agents by QGIS MCP.
pingSimple ping command to check server connectivity
get_qgis_infoGet QGIS information about the current installation
load_projectLoad a QGIS project from the specified path
create_new_projectCreate a new project and save it
get_project_infoGet current project information
add_vector_layerAdd a vector layer to the project
Documentation Overview
QGISMCP - QGIS Model Context Protocol Integration
QGISMCP connects QGIS to Claude AI through the Model Context Protocol (MCP), allowing Claude to directly interact with and control QGIS. This integration enables prompt assisted project creation, layer loading, code execution and more.
This project is strongly based on the BlenderMCP project by Siddharth Ahuja
Features
- Two-way communication: Connect Claude AI to QGIS through a socket-based server.
- Project manipulation: Create, load and save projects in QGIS.
- Layer manipulation: Add and remove vector or raster layers to a project.
- Execute processing: Execute processing algorithms (Processing Toolbox).
- Code execution: Run arbitrary Python code in QGIS from Claude. Very powerful, but also be very cautious using this tool.
Components
The system consists of two main components:
- QGIS plugin: A QGIS plugin that creates a socket server within QGIS to receive and execute commands.
- MCP Server: A Python server that implements the Model Context Protocol and connects to the QGIS plugin.
Installation
Prerequisites
- QGIS 3.X (only tested on 3.22)
- Claude desktop
- Python 3.10 or newer
- uv package manager:
If you're on Mac, please install uv as
On Windows Powershell
Otherwise installation instructions are on their website: Install uv
⚠️ Do not proceed before installing UV
Download code
Download this repo to your computer. You can clone it with:
QGIS plugin
You need to copy the folder qgis_mcp_plugin and its content on your QGIS profile plugins folder.
You can get your profile folder in QGIS going to menu Settings -> User profiles -> Open active profile folder Then, go to Python/plugins and paste the folder qgis_mcp_plugin.
On a Windows machine the plugins folder is usually located at:
C:\Users\USER\AppData\Roaming\QGIS\QGIS3\profiles\default\python\plugins
and on MacOS: ~/Library/Application\ Support/QGIS/QGIS3/profiles/default/python/plugins
Then close QGIS and open it again. Go to the menu option Plugins > Installing and Managing Plugins, select the All tab and search for "QGIS MCP", then mark the QGIS MCP checkbox.
Claude for Desktop Integration
Go to Claude > Settings > Developer > Edit Config > claude_desktop_config.json to include the following:
If you can't find the "Developers tab" or the
claude_desktop_config.jsonlook at this documentation.
Usage
Starting the Connection
- In QGIS, go to
plugins>QGIS MCP>QGIS MCP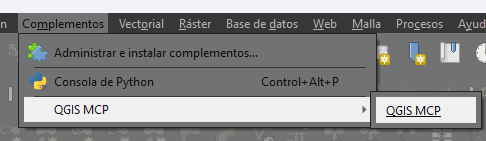
- Click "Start Server"
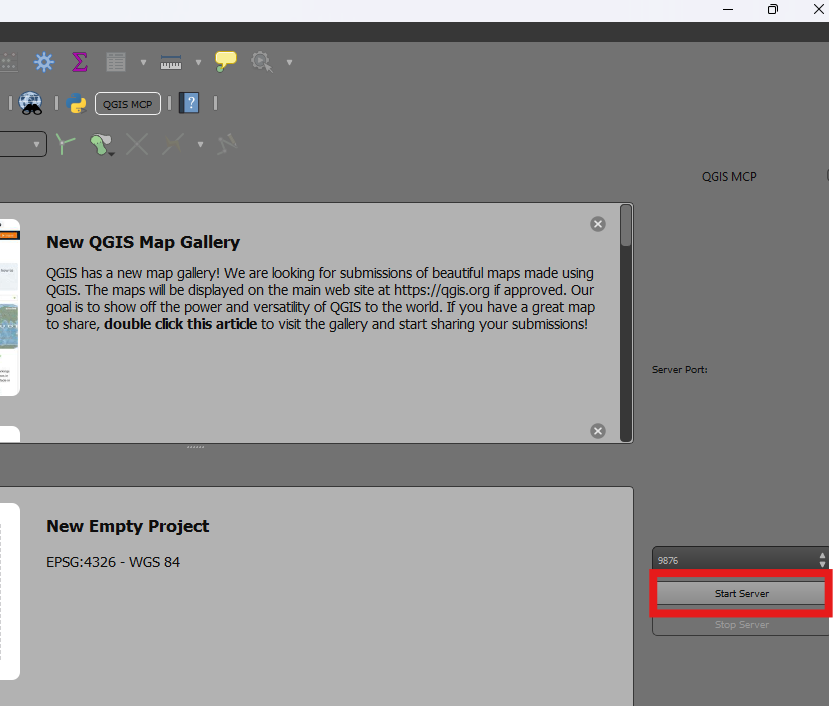
Using with Claude
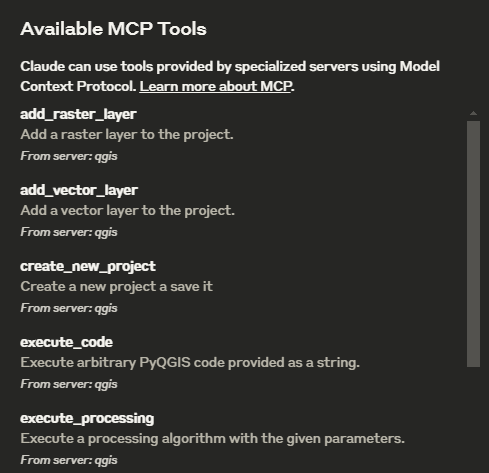
Once the config file has been set on Claude, and the server is running on QGIS, you will see a hammer icon with tools for the QGIS MCP.
Tools
ping- Simple ping command to check server connectivityget_qgis_info- Get QGIS information about the current installationload_project- Load a QGIS project from the specified pathcreate_new_project- Create a new project and save itget_project_info- Get current project informationadd_vector_layer- Add a vector layer to the projectadd_raster_layer- Add a raster layer to the projectget_layers- Retrieve all layers in the current projectremove_layer- Remove a layer from the project by its IDzoom_to_layer- Zoom to the extent of a specified layerget_layer_features- Retrieve features from a vector layer with an optional limitexecute_processing- Execute a processing algorithm with the given parameterssave_project- Save the current project to the given pathrender_map- Render the current map view to an image fileexecute_code- Execute arbitrary PyQGIS code provided as a string
Example Commands
This is the example I used for the demo:
Related MCP Servers
Adoption & maintenance
Factual signals from GitHub, npm, and our automated checks — not a rating.
GitHub stars
1.1k
Stargazers on the source repository.
Last commit
11mo ago
Most recent push to the default branch.
Tools exposed
15
Callable tools this server registers over MCP.
Directory activity
2 views
Config copies, upvotes, and views on AllMCPs.
Reviews
No reviews yet — be the first to share how this listing worked for you.
Frequently Asked Questions about QGIS MCP
AllMCPs Directory Badge
Showcase your server listing on GitHub or your project documentation. Embed this dynamic SVG badge to highlight official listing status and live engagement.
Badge Style:
Live Dynamic SVG Preview
Markdown (GitHub README)
[](https://allmcps.com/mcp/qgis-mcp)HTML Embed
<a href="https://allmcps.com/mcp/qgis-mcp"><img src="https://allmcps.com/api/badge/qgis-mcp?style=directory" alt="QGIS MCP on AllMCPs" /></a>Technical Specs & Signals
CategoryLocation Services
PricingFree
9/10 checks healthy over the last 33d
52Quality signal: Good · 52/100How this signal is calculated ▾
Server availabilityNot measured
Not scored for repo-hosted servers — we can't reach the running server, only its GitHub page. Hosted MCP endpoints are health-checked live.
Verified ownership10/20
Documentation & tools23/30
Adoption & activity6/15
Community engagement0/10
A guidance signal from public completeness & health data — not a user rating. New listings start lower and rise as they add docs, get verified, and grow adoption. Signals we can't observe for a listing are skipped, not counted against it.
Own this project?
This directory is pre-filled from public sources. Claim via GitHub README, site badge, or DNS TXT to unlock edit access and the Official badge — proof is checked automatically, then reviewed by our team.
Free dofollow backlink: add your website and place the AllMCPs badge on it — no claim needed. We detect it automatically and keep it verified as long as the badge stays live.
Claim & get free dofollowShare & Embed
Add our SVG badge (dark/light directory styles) or embeddable widget to your site.