image-editingphotopeagraphicsmcpbrowser
MCP server enabling AI-driven image editing via Photopea's browser-based Photoshop alternative.
Quick Install
Automated & IDE SetupCopy the AI prompt to install this server into Claude Code, Cursor, or another agent — or use 1-click editor setup below.
Automated check passed— started and listed 34 tools correctly (1mo ago).
Manual Client & Custom JSON ConfigExpand JSON ▾
Client Config & Setup
Choose your client or environment
Target File:
💡 Paste the JSON block into your client's configuration file under mcpServers, then restart the application.
Overview
Use cases
Create and resize image documents programmatically
Add, edit, reorder, and group layers in images
Insert and style text and shapes within images
Apply filters, adjustments, and transformations to layers
Export edited images in multiple formats
Key features
Supports 34 tools for document, layer, text, shape, filter, effect, and export operations
Controls Photopea via WebSocket bridge to a browser window
Automatically opens a browser window on first use to run Photopea
Supports loading custom fonts from URLs
Exports images to PNG, JPG, WebP, PSD, and SVG formats
Capabilities & Tool Schemas (34)
Inspect callable tools, capabilities, and parameters exposed to AI agents by Photopea MCP Server.
photopea_create_documentCreate a new blank document and make it the active document. This is typically the first step in a workflow. The document opens with a Background layer. Use open_file instead to edit an existing image.
photopea_open_fileOpen an existing image file in Photopea as a new document. Supports PSD, PNG, JPG, WebP, SVG, and other common formats. The opened file becomes the active document. Use create_document instead to start with a blank canvas.
photopea_get_document_infoGet metadata about the active document including name, width, height, resolution (DPI), layer count, and color mode. Returns JSON. Use this to check document dimensions before positioning layers or making selections.
photopea_resize_documentResize the active document canvas to new pixel dimensions, resampling all layer content to fit. This is a destructive operation — all layers are scaled proportionally. Use undo to revert if needed.
photopea_close_documentClose the active document. Set save to true to save changes before closing. Unsaved changes are discarded if save is false. The next open document becomes active, if any.
photopea_add_layerAdd a new empty layer to the active document. The new layer becomes the active layer. Use this before operations that draw onto a layer, such as fill_selection or add_gradient.
Documentation Overview

Photopea MCP Server
Design posters, edit photos, and transform images directly from your terminal. Powered by Photopea -- a free, browser-based alternative to Photoshop -- connected to your AI agent via MCP.



Demo
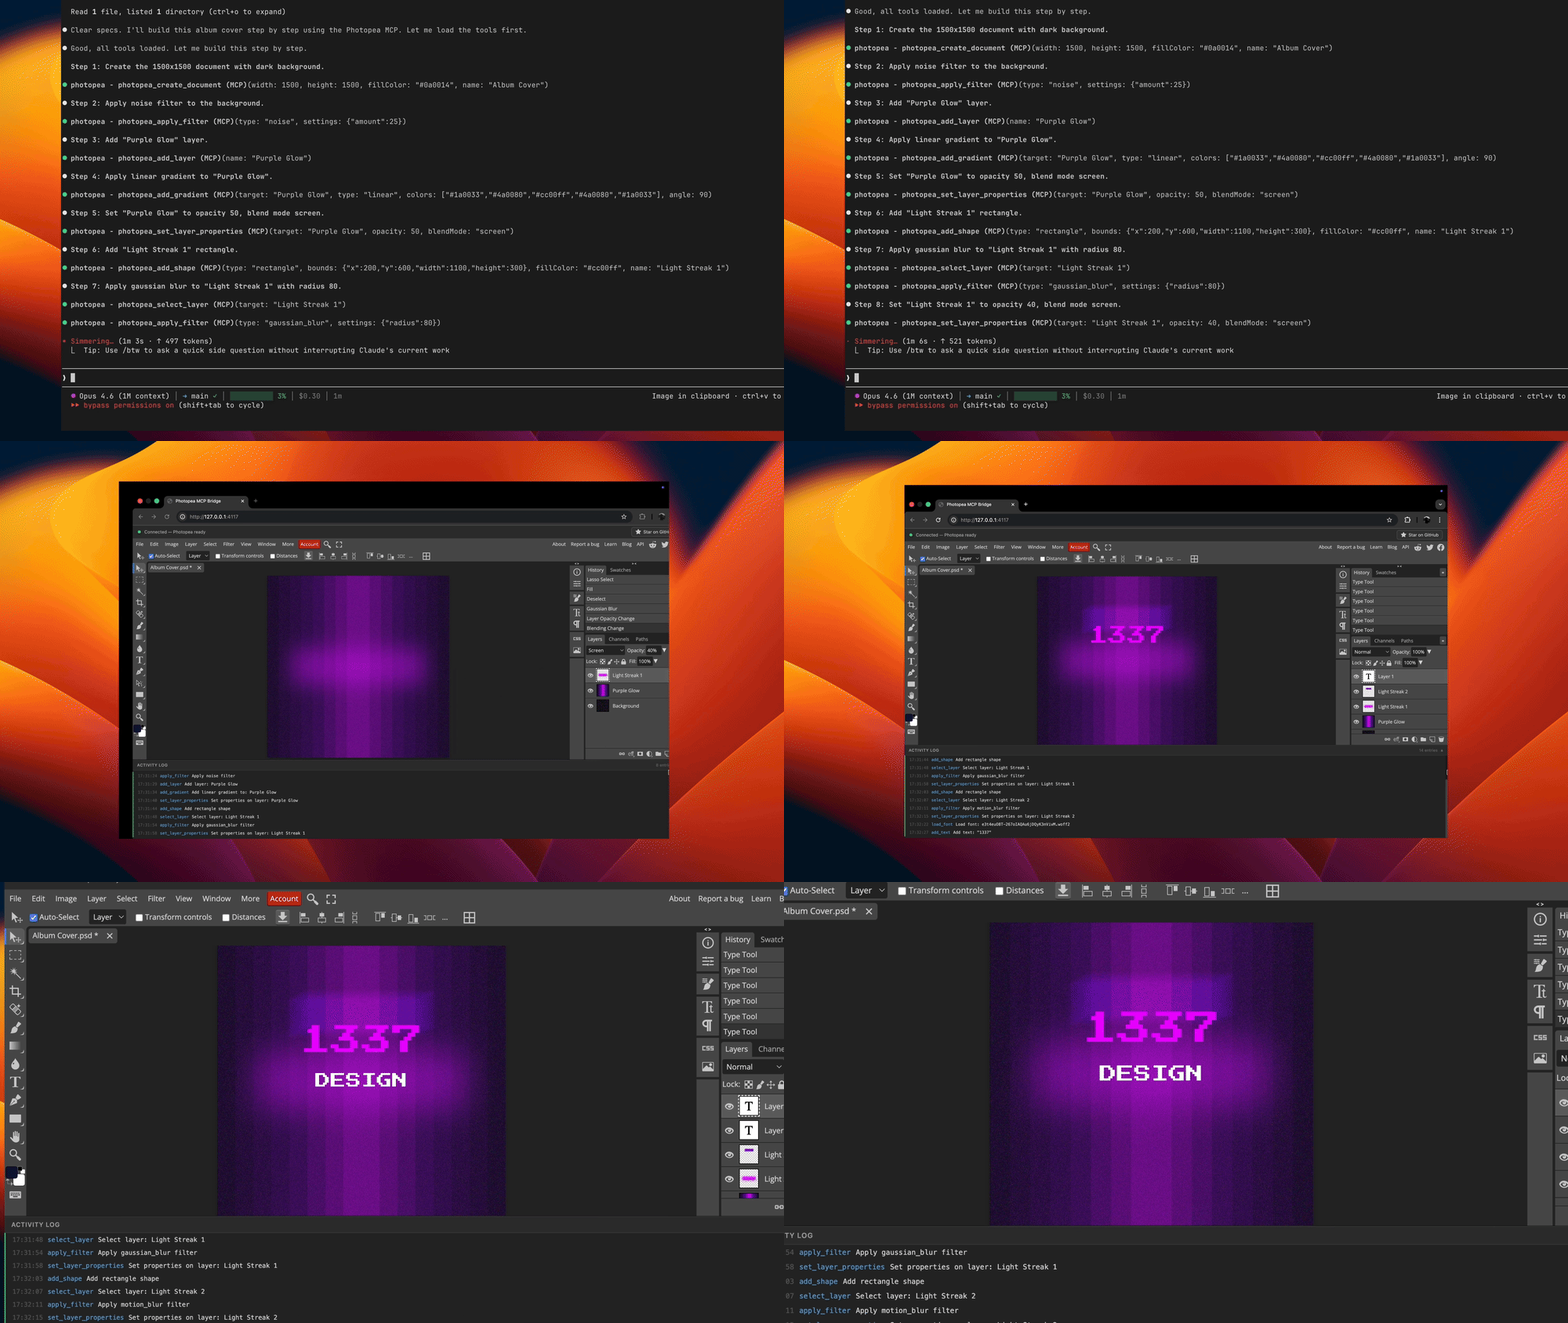
Prompt used in this demo: examples/album-cover-demo.md
How It Works
Your agent sends editing commands through the MCP protocol. The server translates these into Photopea JavaScript API calls and executes them via a WebSocket bridge to the browser.
Note: A browser window will open automatically on the first tool call. This is expected -- Photopea runs entirely in the browser and the server needs it to perform image editing operations.
Quick Start
Then start a new Claude Code session and ask it to edit images. The Photopea editor will open in your browser automatically on the first tool call.
Installation
Claude Code
npx (recommended):
Global install:
Claude Desktop
Add to your Claude Desktop config file (~/Library/Application Support/Claude/claude_desktop_config.json on macOS):
Cursor
Add to Cursor MCP settings (.cursor/mcp.json in your project or ~/.cursor/mcp.json globally):
VS Code (Copilot)
Add to .vscode/mcp.json in your project:
Windsurf
Add to Windsurf MCP settings (~/.windsurf/mcp.json):
Available Tools
Document (5 tools)
| Tool | Description |
|---|---|
photopea_create_document | Create a new document with specified dimensions and settings |
photopea_open_file | Open an image from a URL or local file path |
photopea_get_document_info | Get active document info (name, dimensions, resolution, color mode) |
photopea_resize_document | Resize the active document (resamples content to fit) |
photopea_close_document | Close the active document |
Layer (11 tools)
| Tool | Description |
|---|---|
photopea_add_layer | Add a new empty art layer |
photopea_add_fill_layer | Add a solid color fill layer |
photopea_delete_layer | Delete a layer by name or index |
photopea_select_layer | Make a layer active by name or index |
photopea_set_layer_properties | Set opacity, blend mode, visibility, name, or lock state |
photopea_move_layer | Translate a layer by x/y offset |
photopea_duplicate_layer | Duplicate a layer with optional new name |
photopea_reorder_layer | Move a layer in the stack (above, below, top, bottom) |
photopea_group_layers | Group named layers into a layer group |
photopea_ungroup_layers | Ungroup a layer group |
photopea_get_layers | Get the full layer tree as JSON |
Text & Shape (3 tools)
| Tool | Description |
|---|---|
photopea_add_text | Add a text layer at specified coordinates |
photopea_edit_text | Edit content or style of an existing text layer |
photopea_add_shape | Add a shape (rectangle or ellipse) |
Image & Effects (9 tools)
| Tool | Description |
|---|---|
photopea_place_image | Place an image from URL or local path |
photopea_apply_adjustment | Apply brightness/contrast, hue/saturation, levels, or curves |
photopea_apply_filter | Apply gaussian blur, sharpen, unsharp mask, noise, or motion blur |
photopea_transform_layer | Scale, rotate, or flip a layer |
photopea_add_gradient | Apply a linear gradient fill |
photopea_make_selection | Create a rectangular, elliptical, or full selection |
photopea_modify_selection | Expand, contract, feather, or invert a selection |
photopea_fill_selection | Fill the current selection with a color |
photopea_clear_selection | Deselect the current selection |
Export & Utility (6 tools)
| Tool | Description |
|---|---|
photopea_export_image | Export to PNG, JPG, WebP, PSD, or SVG |
photopea_load_font | Load a custom font from a URL (TTF, OTF, WOFF2) |
photopea_list_fonts | List available fonts, with optional search filter |
photopea_run_script | Execute arbitrary Photopea JavaScript |
photopea_undo | Undo one or more actions |
photopea_redo | Redo one or more actions |
Usage Examples
Once installed, ask your agent to perform image editing tasks:
Create a poster:
"Create a 1920x1080 document with a dark blue background, add the title 'Hello World' in white 72px Arial, and export it as a PNG to ~/Desktop/poster.png"
Edit a photo:
"Open ~/photos/portrait.jpg, increase the brightness by 30, apply a slight gaussian blur of 2px, and export as JPG to ~/Desktop/edited.jpg"
Composite images:
"Create a 1200x630 document, place ~/assets/background.png as the base layer, then place ~/assets/logo.png and move it to the top-right corner"
Batch adjustments:
"Open ~/photos/sunset.jpg, apply hue/saturation with +20 saturation, apply an unsharp mask with amount 50 and radius 2, then export as PNG"
Development
Commands
| Command | Description |
|---|---|
npm run build | Compile TypeScript to dist/ |
npm run dev | Watch mode with auto-reload |
npm test | Run unit and integration tests |
npm start | Start the server |
Architecture
The server has four main components:
MCP Server (src/server.ts) -- Registers all 34 tools with the MCP SDK and connects via stdio transport.
WebSocket Bridge (src/bridge/websocket-server.ts) -- Manages the connection between the MCP server and the browser. Queues script execution requests and handles responses with timeouts.
Script Builder (src/bridge/script-builder.ts) -- Pure functions that translate tool parameters into Photopea JavaScript API calls. Each builder function generates a script string that Photopea can execute.
Browser Frontend (src/frontend/index.html) -- A single-page app that loads Photopea in an iframe, connects to the WebSocket bridge, and relays scripts to Photopea via postMessage. Returns results back through the WebSocket.
Security
- The MCP server binds to
127.0.0.1(localhost only) and is not accessible from the network. - The
photopea_run_scripttool executes arbitrary JavaScript inside Photopea's sandboxed iframe. It is marked as destructive and requires user approval in MCP clients that support tool annotations. - File operations (
open_file,export_image,place_image) read and write files with the same permissions as the user running the server.
Known Limitations
Related MCP Servers
Adoption & maintenance
Factual signals from GitHub, npm, and our automated checks — not a rating.
GitHub stars
35
Stargazers on the source repository.
npm downloads
388
Package downloads in the last 30 days.
Last commit
5mo ago
Most recent push to the default branch.
Availability
100%
Our rolling endpoint + install checks that succeeded.
Install check
Passed
Our sandbox started it and listed its tools.
Tools exposed
34
Callable tools this server registers over MCP.
Directory activity
2 views
Config copies, upvotes, and views on AllMCPs.
Reviews
No reviews yet — be the first to share how this listing worked for you.
Frequently Asked Questions about Photopea MCP Server
AllMCPs Directory Badge
Showcase your server listing on GitHub or your project documentation. Embed this dynamic SVG badge to highlight official listing status and live engagement.
Badge Style:
Live Dynamic SVG Preview
Markdown (GitHub README)
[](https://allmcps.com/mcp/attalla1-photopea-mcp-server)HTML Embed
<a href="https://allmcps.com/mcp/attalla1-photopea-mcp-server"><img src="https://allmcps.com/api/badge/attalla1-photopea-mcp-server?style=directory" alt="Photopea MCP Server on AllMCPs" /></a>