RepoRelay README
The full upstream README, mirrored here for reference. Install config, tool schemas, adoption signals, and an original overview live on the RepoRelay listing page.

Give AI access to your repository — not your machine.
RepoRelay lets ChatGPT safely inspect one local repository without giving it control of the rest of your computer.





Website · npm package · MCP listing
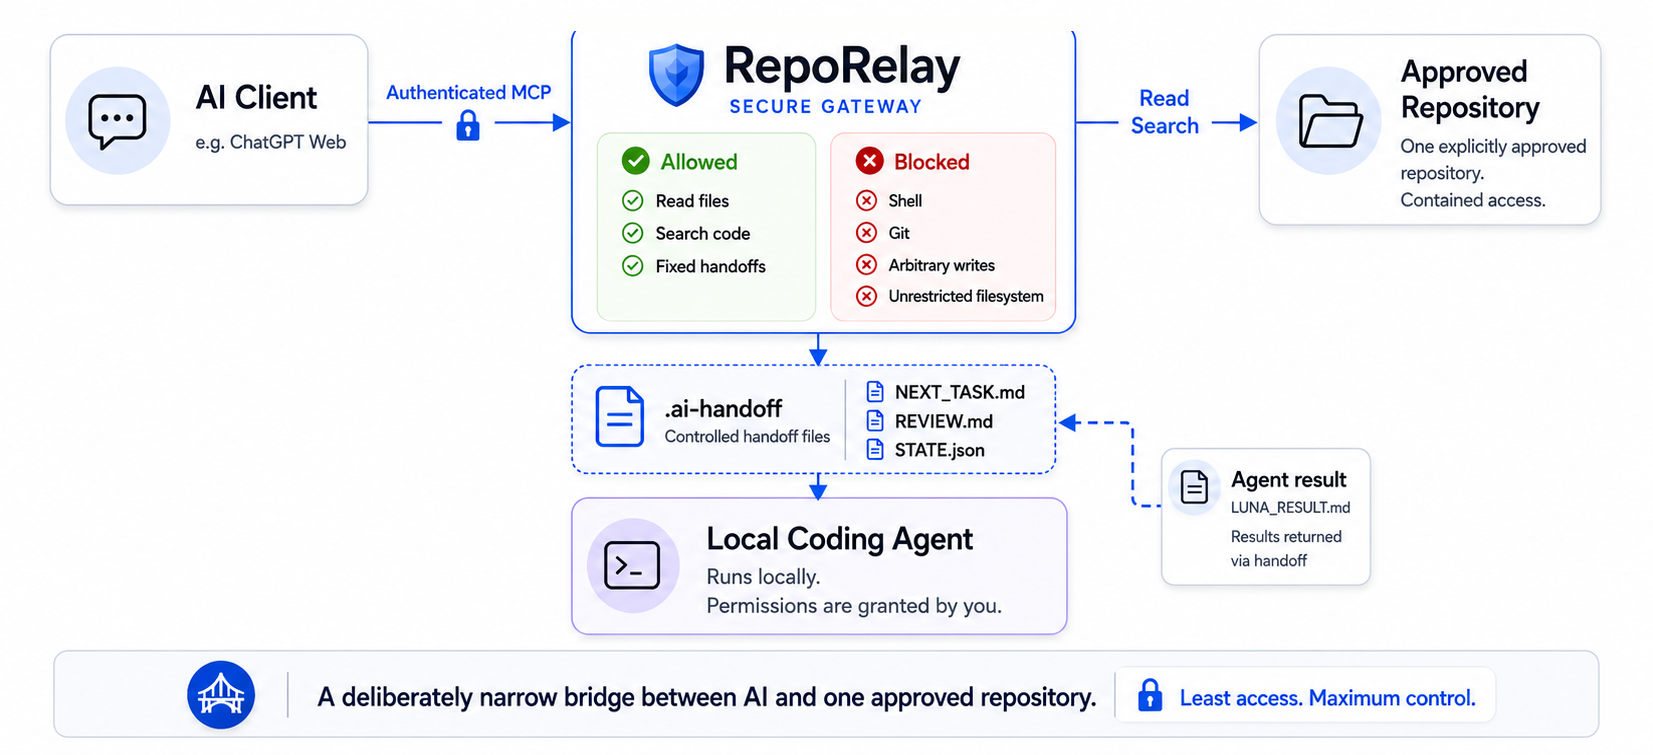
ChatGPT → Secure MCP Tunnel → tunnel-client → RepoRelay → one approved repository
Read safe files · Search code · One approved repository · No shell · No Git · No arbitrary writes
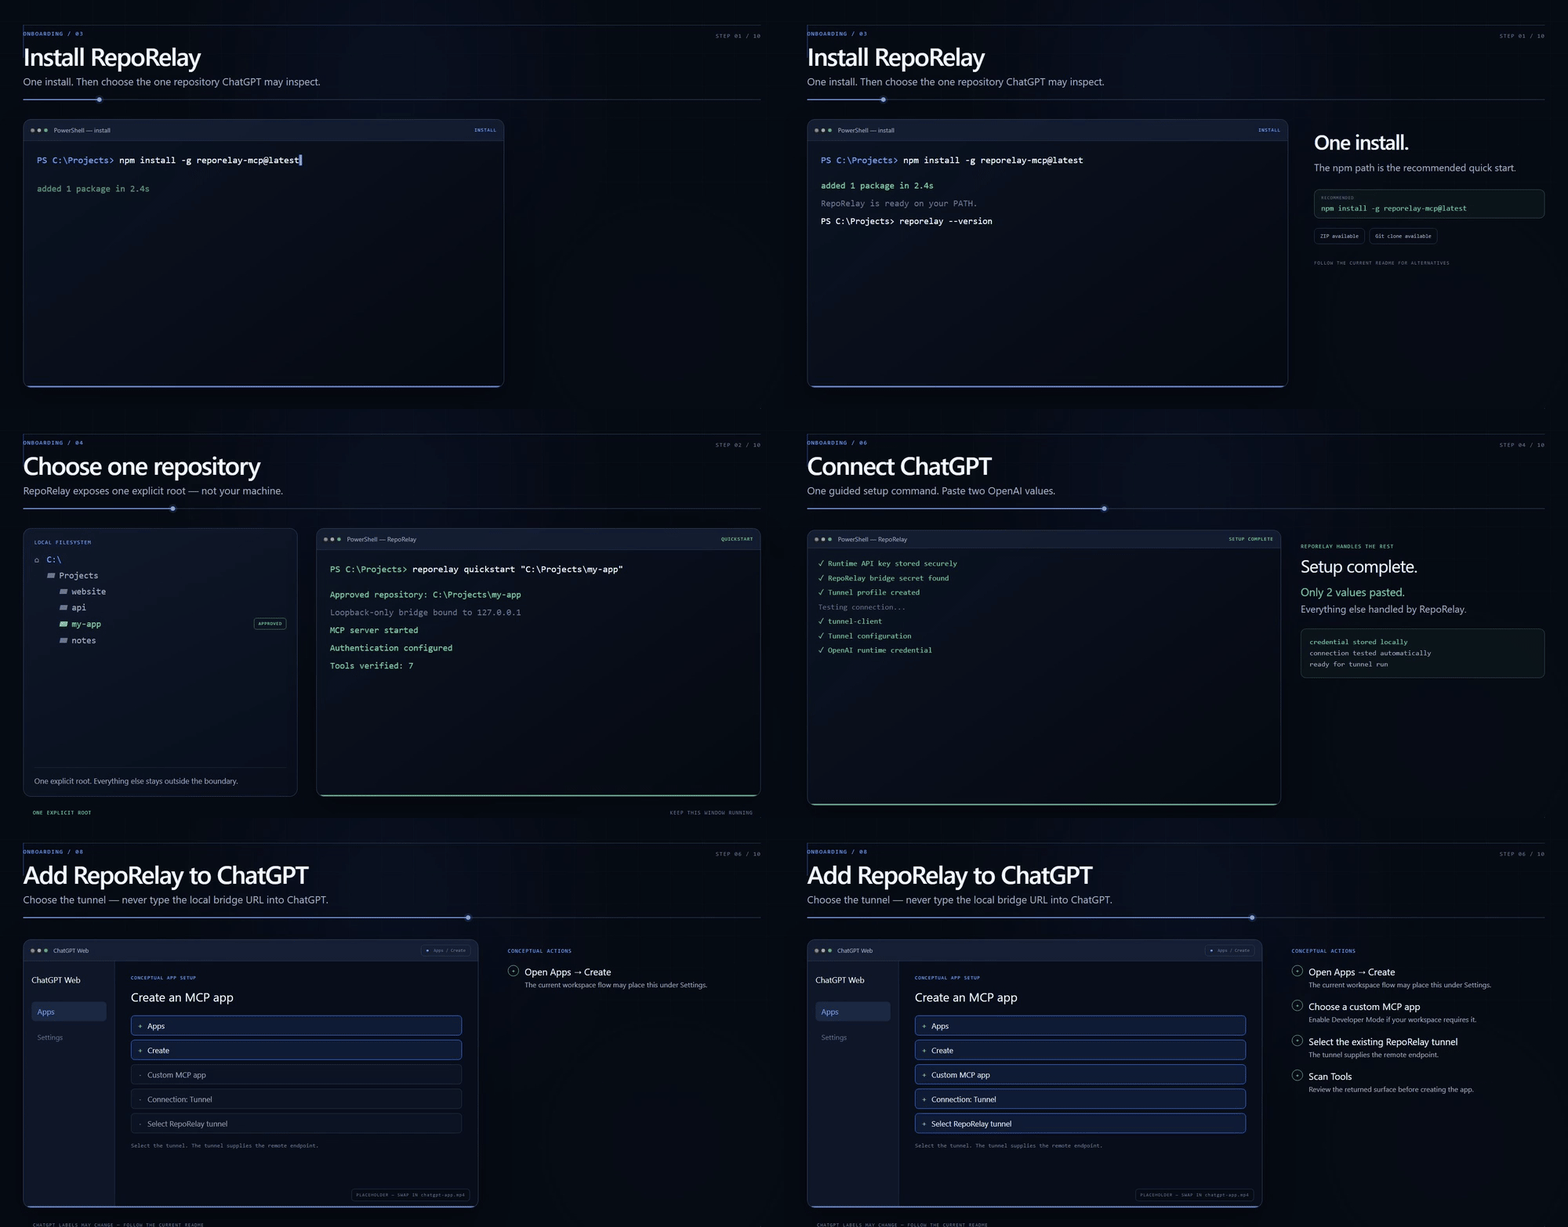
Quick Setup · Use It · Handoff · Troubleshooting · Security
What RepoRelay does
RepoRelay is a local, first-party MCP bridge that gives ChatGPT bounded access to exactly one approved repository on your computer — nothing more.
ChatGPT reviews your code through RepoRelay, and can leave a structured task for a separate local coding agent (like Codex or Claude) through fixed handoff files. RepoRelay is the security boundary between ChatGPT and your machine.
How the safety model works
MCP (Model Context Protocol) is the standard that lets ChatGPT call tools.
ChatGPT is the MCP client. RepoRelay is the local MCP server and security
boundary: it decides what ChatGPT may access and exposes exactly one approved
repository at a time. tunnel-client is only the secure networking pipe that
carries ChatGPT traffic to your computer.
| Component | Job |
|---|---|
| ChatGPT | MCP client — chooses RepoRelay tools. |
| Secure MCP Tunnel | Carries traffic from ChatGPT to your computer. |
tunnel-client | Local network forwarder; points the tunnel at RepoRelay. |
| RepoRelay | MCP server + security boundary; enforces authentication and allowed access. |
| Repository | The one directory ChatGPT is allowed to inspect. |
What ChatGPT can do through RepoRelay (the normal 7-tool setup):
In read-only mode, only the four read/search tools are exposed.
What ChatGPT cannot do:
This is one of RepoRelay's strongest differentiators: ChatGPT can read and plan against your code, but it gets no execution capability and can only write to a few fixed handoff files you control.
Before you install
Which mode should I use?
RepoRelay runs in two modes. The right one depends on your ChatGPT plan and workspace:
| Mode | Start command | Tools in Scan Tools |
|---|---|---|
| Read-only | reporelay quickstart "<repo>" --no-handoff-writes | 4 |
| Handoff (default) | reporelay quickstart "<repo>" | 7 |
- Personal ChatGPT workspaces: if developer mode and the Tunnel connection are available for your account, start with read-only mode. ChatGPT can open, read, and search the repository, but cannot write handoff files. Expect 4 tools.
- Business / Enterprise / Edu workspaces: available capabilities depend on your plan and workspace/admin settings. Where developer features and handoffs are enabled, the normal setup exposes 7 tools (4 read/search + 3 fixed handoff writers).
Both modes share the same security boundary; read-only mode simply disables the three handoff writers. RepoRelay cannot enable ChatGPT developer mode or tunnel access. OpenAI plan and workspace behavior changes over time, so check the current OpenAI Secure MCP Tunnel guide for what your account offers.
You need:
- Node.js
>=22.19and<27(npm is included). Check withnode --version. - An existing local project or repository you want ChatGPT to review. It must be a real folder on your computer — not a drive root and not your whole user folder.
- OpenAI Secure MCP Tunnel access. RepoRelay reaches ChatGPT through OpenAI's Secure MCP Tunnel. See the current OpenAI Secure MCP Tunnel guide for availability, permissions, and plan details.
- Permission to create/use a custom MCP app in the target ChatGPT workspace (ChatGPT developer mode).
You do not need to download anything else. RepoRelay installs the official
OpenAI tunnel-client automatically during reporelay tunnel setup.
Do not worry about the handoff protocol yet. The quickstart sets up working handoff files for you and explains them as you go.
Quick setup
Where setup happens
Setup touches three different surfaces, and the tunnel and the ChatGPT integration are configured in different places:
The Secure MCP Tunnel is created and configured in OpenAI Platform. The ChatGPT integration that uses the tunnel is added inside ChatGPT — not on the Platform page where you created the tunnel. If you already have a tunnel and are wondering "where do I actually add RepoRelay to ChatGPT?", that is step 6 below, inside ChatGPT itself.
Path examples. Always quote the repository path:
C:\Users\you\Projects\my-appis correct.C:Users\you\Projects\my-appis not — the backslashes matter.
1. Install RepoRelay
npm is the supported and tested installer. Check the install:
If reporelay cannot be found (command not found on macOS/Linux, is not recognized on Windows), see Troubleshooting.
2. Start RepoRelay on one repository
Replace the path with the repository you want to expose (Windows example:
reporelay quickstart "C:\Projects\my-app"). Keep this terminal open.
No path? The current directory is only a default. If you omit the
repository path, quickstart uses the directory you are standing in and says
so in its summary. Only this default depends on the current directory —
reporelay tunnel setup, tunnel doctor, and tunnel run read stored
per-user configuration and work from any directory. The tunnel does not need
to be started from the repository directory.
You should see:
The normal quickstart enables the 7-tool handoff surface (4 inspection
tools + 3 fixed handoff writers). RepoRelay now creates a small .ai-handoff
workspace and an AGENTS.md note so ChatGPT can leave structured tasks and
reviews for a separate local coding agent:
Using read-only mode instead (--no-handoff-writes, the recommended starting
mode for personal ChatGPT workspaces that expose developer mode and Tunnel)?
RepoRelay exposes the 4 read/search tools and creates
none of these files. See Read-only mode.
Why does RepoRelay create these? ChatGPT still cannot run commands, use Git, or arbitrarily edit your repository. These files are simply a place where ChatGPT can leave a task, and a separate local coding agent (running on your own machine, with your own permission) can leave its result. More below in ChatGPT ↔ coding-agent handoff.
To stop RepoRelay later, press Ctrl+C in this window. There is no
reporelay quickstart --stop.
3. Audit it
Immediately after quickstart, verify RepoRelay's actual security boundary:
You should see:
Audit starts its own temporary loopback listener and exercises the real
authenticated MCP surface, containment checks, and handoff restrictions. It
does not modify your repository. This validates RepoRelay before ChatGPT is
connected. If you started quickstart with --no-handoff-writes, add the same
flag to the audit command.
4. Run RepoRelay tunnel setup
In a second terminal window, run:
This starts the RepoRelay setup wizard. It does everything for you:
You provide exactly two things, both in OpenAI Platform:
- Your Secure MCP Tunnel ID — the wizard opens
https://platform.openai.com/settings/organization/tunnels in your
browser. Create or select a tunnel, associate it with your ChatGPT
workspace, and paste its
tunnel_idback in the terminal. - A runtime API key — the wizard opens
https://platform.openai.com/settings/organization/api-keys. Create a
secret key for the project you use with the tunnel and paste it in the
terminal. Input is hidden: nothing appears while you paste. This key
authenticates
tunnel-clientto OpenAI; it is not the RepoRelay bridge secret.
Creating or editing a tunnel needs the Tunnels Read + Manage permission;
running tunnel-client or selecting the tunnel needs Tunnels Read + Use.
These are organization-level permissions granted by your org owner or RBAC
admin. Follow the current
OpenAI Secure MCP Tunnel guide
for the exact UI and permission details.
When the wizard finishes, you should see:
These checks are genuine: setup validates the runtime API key against the
OpenAI control plane (the same read-only tunnel lookup tunnel-client performs
at startup) and verifies the bridge secret against the RepoRelay that is
actually running. A wrong, expired, or mis-pasted key is caught here with a
clear message — not after tunnel run starts.
If your RepoRelay runs on a custom port (for example --port 7677),
quickstart already recorded the live endpoint and setup follows it
automatically — no extra flags needed.
Useful options:
reporelay tunnel setup --no-open— do not launch the browser (headless, SSH, or CI); the URLs are still printed.reporelay tunnel setup --replace-tunnel— prompt for a new tunnel ID.reporelay tunnel setup --replace-runtime-key— prompt for a new runtime API key.reporelay tunnel setup --tunnel-client-path "/path/to/tunnel-client"(Windows:tunnel-client.exe) — advanced override for unusual environments; RepoRelay does not verify or manage a custom binary.
Re-running reporelay tunnel setup reuses your existing verified client,
tunnel ID, and stored key, and re-tests the connection without asking for
anything again.
5. Run the tunnel
Keep this window open alongside the RepoRelay quickstart window. Stop it with Ctrl+C when you are done.
If the connection ever stops working, reporelay tunnel doctor remains
available as a standalone troubleshooting command (expect Ready. when
everything is healthy; add --verbose for redacted diagnostics).
6. Add RepoRelay to ChatGPT
This step happens inside ChatGPT — not on the OpenAI Platform page where you created the tunnel.
Naming note: the current ChatGPT UI may have you enter through Plugins, while OpenAI documentation may still refer to the underlying integration as an App or custom MCP app. This guide just says "the RepoRelay integration." See the current ChatGPT developer-mode and MCP apps guide when labels move.
Follow this sequence:
- Enable Developer Mode in ChatGPT settings, or ask your workspace administrator for access. The exact location of the setting may vary by plan or workspace as OpenAI updates the interface.
- Create the custom MCP app.
- Choose the Tunnel connection.
- Select the RepoRelay/OpenAI Secure MCP Tunnel.
- When ChatGPT asks for authentication, select No authentication.
- Save or create the integration.
- Run Scan Tools.
- Verify the expected RepoRelay tools appear.
- Start a new chat and select the RepoRelay integration.
Authentication: No authentication. RepoRelay already authenticates the local bridge through the protected
X-RepoRelay-Bridge-Secretused by the tunnel. Do not configure OAuth or another ChatGPT-side authentication method.
Never paste 127.0.0.1, localhost, the RepoRelay bridge secret, or an OpenAI
runtime API key into ChatGPT. The tunnel connection does all the networking.
7. Scan and verify the RepoRelay tools
In the ChatGPT integration flow, run Scan Tools and confirm that the tool count matches your mode.
Read-only mode (--no-handoff-writes) — exactly 4 tools:
Normal handoff mode — exactly 7 tools (the four above, plus):
A different count usually means the other mode is running. If Scan Tools shows
shell, Git, process execution, generic file editing, delete, patching, or any
other unexpected capability, stop and investigate before using the
integration — run reporelay audit "<repo>" --json and confirm the tool
list.
8. Test it
Start a new chat, select the RepoRelay integration, and try:
Then test the boundary:
The second request should be blocked.
You're connected — now what?
You now have ChatGPT reviewing your repository through a verified security boundary. Useful prompts:
RepoRelay handles that request through the existing list_files tool with
instructionsOnly: true. This recursively discovers recognized instruction
files without adding a broader filename-glob tool or changing the four-tool
read-only surface.
ChatGPT ↔ coding-agent handoff
The normal RepoRelay setup lets ChatGPT plan and review while a separate local
coding agent (Codex, Claude, or another) does the implementation. RepoRelay
coordinates them through a small .ai-handoff workspace:
Conceptually:
STATE.json coordinates the cycle. RepoRelay itself does not run Codex or
Claude — they are separate local applications you start yourself. The
handoff files are just a structured place to hand work back and forth.
ChatGPT can only write NEXT_TASK.md, REVIEW.md, and STATE.json. The
implementer-owned RESULT.md is never writable by ChatGPT.
See docs/handoff-cycle.md for the detailed protocol and examples/ for reviewer and implementer prompts.
Daily use
After the one-time setup, do not recreate the tunnel or the ChatGPT integration. Each day:
-
Start RepoRelay:
-
Start the tunnel (in a second window):
-
Open ChatGPT, start a new chat, and select the existing RepoRelay integration.
Both commands can be run from any directory: quickstart takes the repository path explicitly, and the tunnel reads its stored per-user configuration.
Keep both windows open while you use the integration. If the connection stops
working, run reporelay tunnel doctor again.
Switch repositories
RepoRelay exposes one repository at a time.
-
Press Ctrl+C in the RepoRelay terminal.
-
Start RepoRelay for the new repository:
-
Keep
tunnel-clientrunning. It reconnects to the restarted RepoRelay automatically (same port and protected bridge-secret file). If you used a different port, the managed tunnel follows it automatically. -
Start a new ChatGPT conversation and select the RepoRelay integration.
-
Ask ChatGPT to open the new repository.
Do not rescan tools just because the approved repository changed. Rescan only if the tool definitions changed or ChatGPT asks you to.
Troubleshooting
| You see | What to do |
|---|---|
'node' is not recognized / node: command not found | Node.js is not installed, or the terminal was opened before the install finished. Install Node.js from https://nodejs.org, close and reopen the terminal, and check node --version. |
RepoRelay requires Node.js >=22.19 and <27 | Your Node version is unsupported. Install a supported Node.js LTS release, reopen the terminal, and check node --version. |
'reporelay' is not recognized (Windows) | The npm install did not finish or the terminal was opened before it finished. Re-run npm install -g reporelay-mcp@latest, close and reopen the terminal, and try reporelay --version. |
reporelay: command not found (macOS/Linux) | The reporelay binary is not on your PATH. npm is the supported installer — re-run npm install -g reporelay-mcp@latest and reopen the terminal. If you installed globally with another package manager (Bun, pnpm, yarn), its global-bin directory may not be on your PATH; fix that package manager's PATH setting or reinstall with npm. Invoking node .../node_modules/reporelay-mcp/dist/cli.js through a nested package-manager path is a workaround, not a supported install. |
Cannot find module ... dist\cli.js | You are running from a source checkout in the wrong folder. cd into the RepoRelay folder and run npm run build first. |
C:Users\you\... (path looks mangled) | You dropped the backslashes. Quote the full Windows path: reporelay quickstart "C:\Users\you\Projects\my-app". |
| Repository does not exist / not a directory | RepoRelay requires an existing directory. Double-check the quoted path and that the folder exists. |
| Repository root is too broad | The approved root must be a real project folder, not a drive root or your whole user folder. |
Port 7676 is already in use | Another RepoRelay or program is listening on that port. Press Ctrl+C in its window to stop it, or rerun quickstart with a custom port (--port 7677) — the managed tunnel follows the new port automatically. There is no quickstart --stop; stop RepoRelay with Ctrl+C. On Windows, find the listener with `Get-NetTCPConnection -LocalPort 7676 -State Listen |
Quickstart stops about an existing AGENTS.md | The repository already has an AGENTS.md without the RepoRelay marker. RepoRelay will not overwrite it. Review the file first; if you want RepoRelay to preserve it and append the marked handoff instructions, rerun reporelay quickstart "..." --append-agent-instructions. |
tunnel-client missing | Rerun reporelay tunnel setup; it re-downloads and verifies the managed client. |
| Invalid tunnel ID | The ID must look like tunnel_ followed by 32 hex characters. Copy it again from Platform tunnel settings. |
| Runtime credential rejected | The runtime API key or tunnel context was not accepted. Check that the tunnel is associated with the target ChatGPT workspace (not only a Platform organization), that the key belongs to the same OpenAI organization/project as the tunnel, and that your account has Tunnels Read + Use. Rerun reporelay tunnel setup --replace-runtime-key. |
| Control plane unreachable | RepoRelay could not contact OpenAI to validate the credential. Check your internet connection, then rerun reporelay tunnel doctor. |
| Tunnel doctor cannot reach MCP | Keep the RepoRelay quickstart window running on the configured port, then rerun reporelay tunnel doctor. |
| Bridge authentication failure | Do not paste a secret. Confirm quickstart is using the canonical bridge-secret file, then rerun reporelay tunnel setup. |
| ChatGPT cannot see the tunnel | Check that the tunnel is associated with the target ChatGPT workspace (not only a Platform organization) and that you have tunnel-use permission. |
| Scan Tools returns zero tools | Keep both the RepoRelay and tunnel windows open, confirm reporelay tunnel doctor reports Ready., then rescan in a new chat with the RepoRelay integration selected. |
| Scan Tools shows unexpected tools | Stop and investigate before using the integration: run reporelay audit "<repo>" --json and confirm the expected list — 4 tools in read-only mode, 7 with handoff writes. |
| RepoRelay window was closed | RepoRelay stopped. Restart it with reporelay quickstart "<repo>", then try again in a new chat. |
| Tunnel window was closed | tunnel-client stopped. Restart it with reporelay tunnel run, then try again in a new chat. |
| Custom port mismatch | Confirm the RepoRelay quickstart port matches what reporelay tunnel doctor reports as the local MCP endpoint. Quickstart records the live endpoint automatically, or set it explicitly with reporelay tunnel setup --port <port>. |
For anything else, run reporelay doctor. It prints configuration and security
status without printing secret values.
Read-only mode (--no-handoff-writes)
Read-only mode is the recommended starting workflow for personal ChatGPT workspaces where developer mode and Tunnel are available (see Which mode should I use?), and for anyone who wants ChatGPT to inspect only — no handoff files, no writes at all:
In this mode RepoRelay exposes exactly four tools:
Read-only mode does not create .ai-handoff, does not create or modify
AGENTS.md, and leaves the approved repository unchanged. All containment,
authentication, and security checks still apply. Use the matching audit flag:
When you use this mode, expect 4 tools in Scan Tools instead of 7.
Security
RepoRelay's enforced boundary includes:
- loopback-only binding and authentication required;
- exactly one existing canonical approved root;
- sensitive paths blocked, including
.env, VCS metadata, credential stores, and private-key formats; - traversal, absolute outside-root paths, symlink/junction/reparse escapes, and hard-link bypasses blocked;
- bounded reads, searches, results, and handoff content;
- no shell, PowerShell, Git, process, generic write, patch, delete, artifact, worktree, skill, subagent, or local-agent tool;
- handoff writes limited to the three fixed pre-existing targets.
RepoRelay is a least-privilege application boundary, not an operating-system sandbox against malicious software already running as the same local user. An external Secure MCP Tunnel is a separate security boundary and must be secured independently. Choose the approved repository carefully.
See SECURITY.md for the full security model and
reporelay audit documentation.
Advanced configuration
Most users never need these. When you do:
- Configuration —
REPORELAY_*environment variables, bridge authentication, ports, logging, and handoff mode. - ChatGPT Web setup details — the full tunnel and app reference.
- Windows operations — lifecycle scripts, scheduled tasks, and managed Windows setup.
.env.example— placeholder configuration only. Never put a real bridge secret or tunnel credential in it.- Local MCP clients — if your MCP client runs on the same computer as
RepoRelay, you do not need the tunnel: point it at the local MCP URL printed
by quickstart and send the
X-RepoRelay-Bridge-Secretheader loaded from the protected file.
For configuration and security status without printing secret values:
Requirements and platform support
- Node.js
>=22.19 <27(npm is included); - Git for the clone-based install — optional if you download the ZIP instead.
The quickstart in this README works on Windows, macOS, and Linux; npm is the supported installer. Windows 10/11 is the fully validated lifecycle and operational platform, including the PowerShell scripts and tunnel-managed runbook.
Limitations
- One approved repository is exposed at a time.
- RepoRelay is not an operating-system sandbox.
- ChatGPT Web needs external OpenAI Secure MCP Tunnel infrastructure to reach a private local bridge.
- Windows is the fully validated lifecycle platform; other platforms do not have identical PowerShell/tunnel operations.
- Codex, Claude, and other coding agents are separate local applications, not components of RepoRelay.
Documentation
- ChatGPT Web setup
- Security model
- Configuration
- Windows operations
- Setup notes
- Handoff cycle
- Handoff examples
- Contributing
License and project lineage
RepoRelay is released under the MIT License. The project keeps its required upstream attribution and does not bundle the SDKs or runtimes of Codex, Claude, or other implementers.