securitycctvvideovmsptz
MCP server to connect with CCTV VMS for retrieving video streams and controlling playback and PTZ cameras.
Quick Install
Automated & IDE SetupCopy the AI prompt to install this server into Claude Code, Cursor, or another agent — or use 1-click editor setup below.
One-click editor setup isn’t available for this listing yet — we don’t have a confirmed install command, and we’d rather show nothing than point your editor at the wrong package or host. Follow the project’s own setup instructions, linked above.
Manual Client & Custom JSON ConfigExpand JSON ▾
No confirmed setup config for this listing yet. We only publish a config block when the install details come from the project itself — its README, its docs, or a verified owner. We haven’t found those for jyjune/mcp_vms, and we’d rather show nothing than a guess you’d paste into your client. Follow the project’s own setup instructions for the current steps.
Overview
Use cases
Retrieve live video stream snapshots from CCTV channels
Fetch recorded video segments for specific channels and times
Display live or playback video dialogs for monitoring
Control PTZ cameras by moving to preset positions
Query channel connection and recording status
Key features
Access channel info including connection and recording status
Fetch recording dates and times per channel
Retrieve live or recorded images from video channels
Show live or playback dialogs for specified channels and timestamps
Control PTZ camera presets
Error handling and logging
Capabilities & Tool Schemas
Inspect callable tools, capabilities, and parameters exposed to AI agents by MCP Vms.
Extracted Tool Capabilities
Access channel info including connection and recording status
Fetch recording dates and times per channel
Retrieve live or recorded images from video channels
Show live or playback dialogs for specified channels and timestamps
Control PTZ camera presets
Error handling and logging
Documentation Overview

MCP Server - VMS Integration
A Model Context Protocol (MCP) server designed to connect to a CCTV recording program (VMS) to retrieve recorded and live video streams. It also provides tools to control the VMS software, such as showing live or playback dialogs for specific channels at specified times.
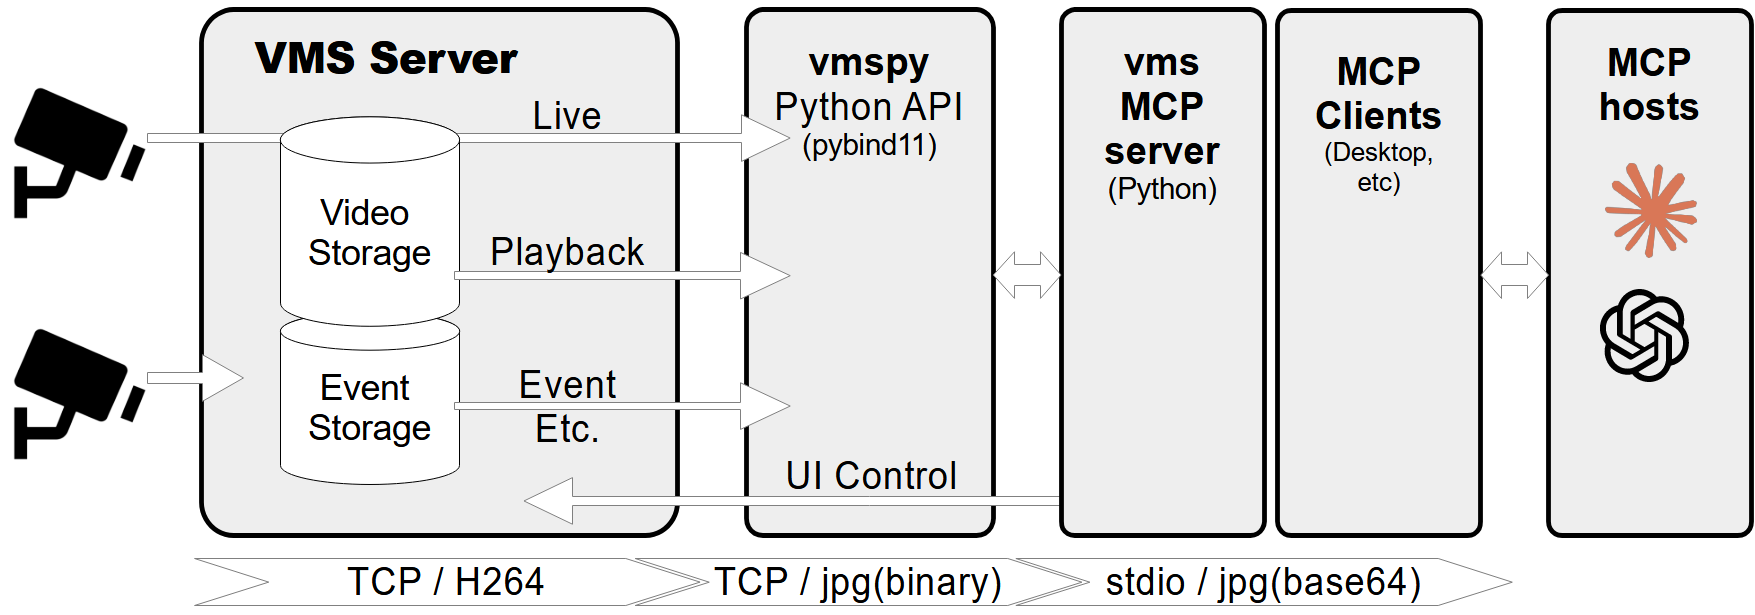
Features
- Retrieve video channel information, including connection and recording status.
- Fetch recording dates and times for specific channels.
- Fetch live or recorded images from video channels.
- Show live video streams or playback dialogs for specific channels and timestamps.
- Control PTZ (Pan-Tilt-Zoom) cameras by moving them to preset positions.
- Comprehensive error handling and logging.
Prerequisites
- Python 3.12+
vmspylibrary (for VMS integration)Pillowlibrary (for image processing)
MCP-server Configuration
If you want to use mcp-vms with Claude desktop, you need to set up the claude_desktop_config.json file as follows:
VMS Connection Configuration
The server uses the following default configuration for connecting to the VMS:
- mcp_vms_config.py
Installation
1. Install UV Package Manager
Run the following command in PowerShell to install UV:
For alternative installation methods, see the official UV documentation.
2.Install VMS Server
Download and install the VMS server from:
http://surveillance-logic.com/en/download.html
(Required before using this MCP server)
3.Install Python Dependencies
Download the vmspy library:
vmspy1.4-python3.12-x64.zip
Extract the contents into your mcp_vms directory
The mcp-vms directory should look like this:

Related MCP Servers

Adoption & maintenance
Factual signals from GitHub, npm, and our automated checks — not a rating.
GitHub stars
17
Stargazers on the source repository.
Last commit
1mo ago
Most recent push to the default branch.
Directory activity
1 views
Config copies, upvotes, and views on AllMCPs.
Reviews
No reviews yet — be the first to share how this listing worked for you.
Frequently Asked Questions about MCP Vms
AllMCPs Directory Badge
Showcase your server listing on GitHub or your project documentation. Embed this dynamic SVG badge to highlight official listing status and live engagement.
Badge Style:
Live Dynamic SVG Preview
Markdown (GitHub README)
[](https://allmcps.com/mcp/jyjune-mcp-vms)HTML Embed
<a href="https://allmcps.com/mcp/jyjune-mcp-vms"><img src="https://allmcps.com/api/badge/jyjune-mcp-vms?style=directory" alt="MCP Vms on AllMCPs" /></a>Technical Specs & Signals
CategorySecurity
PricingFree
10/10 checks healthy over the last 31d
47Quality signal: Fair · 47/100How this signal is calculated ▾
Server availabilityNot measured
Not scored for repo-hosted servers — we can't reach the running server, only its GitHub page. Hosted MCP endpoints are health-checked live.
Verified ownership10/20
Documentation & tools20/30
Adoption & activity5/15
Community engagement0/10
A guidance signal from public completeness & health data — not a user rating. New listings start lower and rise as they add docs, get verified, and grow adoption. Signals we can't observe for a listing are skipped, not counted against it.
Own this project?
This directory is pre-filled from public sources. Claim via GitHub README, site badge, or DNS TXT to unlock edit access and the Official badge — proof is checked automatically, then reviewed by our team.
Free dofollow backlink: add your website and place the AllMCPs badge on it — no claim needed. We detect it automatically and keep it verified as long as the badge stays live.
Claim & get free dofollowShare & Embed
Add our SVG badge (dark/light directory styles) or embeddable widget to your site.