AllMCPs
BrowseBestCategoriesStackCompareToolsGuidesBlog Log in Submit MCP

Stay in the loop

Get new MCP servers and top picks in your inbox.

AllMCPs

The open directory for discovering and installing Model Context Protocol servers.

Explore

  • Browse servers
  • Best MCP servers
  • Categories
  • MCP clients
  • Agent prompts
  • Stack Builder
  • Compare servers
  • Tags index
  • Submit a server
  • Pricing

Learn

  • Guides hub
  • What is MCP?
  • Install guide
  • Troubleshooting
  • Security
  • Blog
  • Blog RSS

Tools

  • All tools
  • Config generator
  • Config validator
  • MCP playground
  • OpenAPI β†’ MCP
  • Badge generator

For agents

  • API docs
  • Trust & traffic
  • llms.txt β†— (opens in a new tab)
  • Catalog JSON β†— (opens in a new tab)
  • Remote MCP β†— (opens in a new tab)

Company

  • About
  • Contact
  • X (@AllMCPs) β†— (opens in a new tab)
  • GitHub β†— (opens in a new tab)
  • Terms
  • Privacy
AllMCPs VerifiedAllMCPs VerifiedFeatured on Nick LaunchesFeatured on Nick LaunchesLaunch Llama NewsletterLaunch Llama NewsletterVerified DR - allmcps.comVerified DR - allmcps.comFeatured on SaaSGrowFeatured on SaaSGrowFeatured on Twelve ToolsFeatured on Twelve ToolsFeatured on Saaspa.geFeatured on Saaspa.geFeatured on Findly.toolsFeatured on Findly.toolsFeatured on Startup FameFeatured on Startup FameFeatured on LaunchKiwiFeatured on LaunchKiwiFeatured on ScrollLaunchFeatured on ScrollLaunchFeatured on DailyPingsFeatured on DailyPingsFazier badgeFazier badgeFeatured on NewTool.siteFeatured on NewTool.siteFeatured on saasfame.comFeatured on saasfame.comDR Checker - Domain RatingDR Checker - Domain RatingListed on Turbo0Listed on Turbo0Launched on LaunchBoard - Product Launch PlatformLaunched on LaunchBoard - Product Launch PlatformList on SimilarlabsList on Similarlabshttps://codetrendy.comhttps://codetrendy.comListed on DevTool.ioFeatured on BuildlistFeatured on BuildlistAllMCPs VerifiedAllMCPs VerifiedFeatured on Nick LaunchesFeatured on Nick LaunchesLaunch Llama NewsletterLaunch Llama NewsletterVerified DR - allmcps.comVerified DR - allmcps.comFeatured on SaaSGrowFeatured on SaaSGrowFeatured on Twelve ToolsFeatured on Twelve ToolsFeatured on Saaspa.geFeatured on Saaspa.geFeatured on Findly.toolsFeatured on Findly.toolsFeatured on Startup FameFeatured on Startup FameFeatured on LaunchKiwiFeatured on LaunchKiwiFeatured on ScrollLaunchFeatured on ScrollLaunchFeatured on DailyPingsFeatured on DailyPingsFazier badgeFazier badgeFeatured on NewTool.siteFeatured on NewTool.siteFeatured on saasfame.comFeatured on saasfame.comDR Checker - Domain RatingDR Checker - Domain RatingListed on Turbo0Listed on Turbo0Launched on LaunchBoard - Product Launch PlatformLaunched on LaunchBoard - Product Launch PlatformList on SimilarlabsList on Similarlabshttps://codetrendy.comhttps://codetrendy.comListed on DevTool.ioFeatured on BuildlistFeatured on Buildlist
Β© 2026 Jackalope Digital LLC. All rights reserved.
  1. Home
  2. 🏠 Home Automation
  3. CI Control Bridge
CI Control Bridge logo
Health: ActiveRecent health check succeeded.Last checked 8/10/2026, 11:56:40 PM

CI Control Bridge

Enrichment pendingWe haven’t run our AI enrichment pass on this listing yet, so the overview, use cases, and FAQ below may be sparse or missing. We work through the catalog over time β€” check back soon.
View Repository5 GitHub StarsTotal stargazers on GitHub for the source repository (5 stars).

Control monitor brightness, contrast, power and input via DDC/CI with MCP and MQTT support.

Quick Install

Automated & IDE Setup

Copy the AI prompt to install this server into Claude Code, Cursor, or another agent β€” or use 1-click editor setup below.

Add to CursorAdd to VS Code
Not yet automatically verified

We haven't yet run this listing's install command through our automated sandbox check. This isn't a red flag β€” we're steadily working through the catalog.

Manual Client & Custom JSON ConfigExpand JSON β–Ύ

Install Config Generator

Choose your client
claude_desktop_config.json
{
  "mcpServers": {
    "ddc-ci-control-bridge": {
      "command": "npx",
      "args": [
        "-y",
        "ddc-ci-control-bridge"
      ]
    }
  }
}

πŸ’‘ Paste into ~/Library/Application Support/Claude/claude_desktop_config.json (macOS) or %APPDATA%\Claude\claude_desktop_config.json (Windows)

Install Tool Schemas (5) Directory Badge Claim listing Alternatives🏠 More in Home Automation

Capabilities & Tool Schemas (5) ~56 tokensApproximate context cost of this server’s tool schemas (~4 chars/token), before any tool is called. Actual usage depends on your client and model.Self-reported Self-reportedParsed from the repository README, not verified against a live server β€” may be incomplete or out of date.

Inspect callable tools, capabilities, and parameters exposed to AI agents by CI Control Bridge.

get_vcp_code

Read a specific VCP code value

set_vcp_code

Write a value to a VCP code

get_brightness

Get monitor brightness (0-100)

set_brightness

Set monitor brightness (0-100)

refresh_monitors

Re-scan monitors and VCP capabilities

Documentation Overview

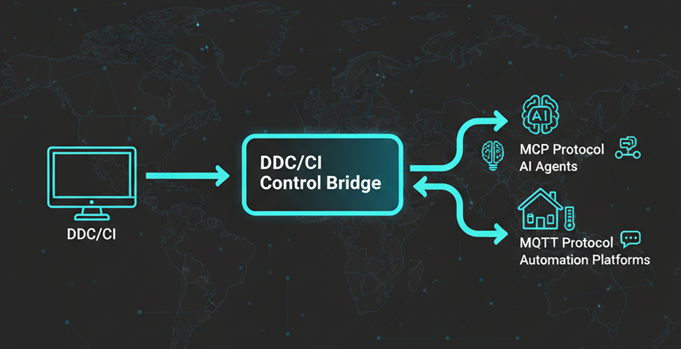
DDC/CI Control Bridge
DDC/CI Control Bridge

NPM Version MIT licensed GitHub Release

Install MCP Server Install in VS Code

Multi-protocol server for DDC/CI monitor control with MCP and MQTT support.

Features

  • DDC/CI Monitor Control: Read and write VCP codes to control monitor brightness, contrast, input source, and more
  • Model Context Protocol (MCP): Server with resources and tools for AI/agent integration
  • MQTT Client: Connect to any MQTT broker for IoT/automation platforms
    • Home Assistant auto-discovery support
    • Generic MQTT pub/sub for custom integrations
  • Cross-Platform: Works on Windows, Linux, and macOS
  • Dual Distribution: Available as standalone executable or npm package

Quick Start

Installation

Option 1: NPM Package (Global)

Terminal
npm install -g ddc-ci-control-bridge
ddc-ci-bridge

Option 2: NPX (No Install)

Terminal
npx ddc-ci-control-bridge

Option 3: Standalone Executable

Download the binary for your platform from GitHub Releases:

  • Windows: ddc-ci-bridge-win.exe
  • Linux: ddc-ci-bridge-linux
  • macOS: ddc-ci-bridge-macos

⚠️ Note: The executable requires DDC_API_KEY environment variable to be set, or it will exit immediately.

Windows:

cmd
# Set API key (required)
set DDC_API_KEY=your-secret-key

# Run the executable
ddc-ci-bridge-win.exe

# Or set multiple environment variables
set DDC_API_KEY=your-secret-key
set MQTT_ENABLED=true
set MQTT_HOST=192.168.1.100
ddc-ci-bridge-win.exe

Linux/macOS:

bash
# Make executable (first time only)
chmod +x ddc-ci-bridge-linux  # or ddc-ci-bridge-macos

# Run with API key (required)
DDC_API_KEY=your-secret-key ./ddc-ci-bridge-linux

# Or with multiple environment variables
DDC_API_KEY=your-secret-key MQTT_ENABLED=true MQTT_HOST=192.168.1.100 ./ddc-ci-bridge-linux

Using with MCP Clients:

Configure your MCP client to use the executable path:

config.json
{
  "mcpServers": {
    "ddc-ci-bridge": {
      "command": "C:\\path\\to\\ddc-ci-bridge-win.exe",
      "args": [],
      "env": {
        "MQTT_ENABLED": "false"
      }
    }
  }
}

MCP Client Setup

Choose between Local (stdio) or Remote (HTTP) setup depending on your needs:

  • Local Setup: Run MCP server on the same machine as your monitors (recommended for most users)
  • Remote Setup: Run MCP server on a monitor-connected machine, access from other devices

πŸ–₯️ Local Setup (stdio - Same Machine)

Use this if your MCP client is on the same machine as your monitors.

Install in Cursor (Local)

Go to: Settings β†’ Cursor Settings β†’ MCP β†’ Add new global MCP server

Install MCP Server

Or paste the following configuration into your ~/.cursor/mcp.json file:

config.json
{
  "mcpServers": {
    "ddc-ci-bridge": {
      "command": "npx",
      "args": ["-y", "ddc-ci-control-bridge"],
      "env": {
        "MQTT_ENABLED": "false",
        "MQTT_HOST": "localhost",
        "MQTT_PORT": "1883"
      }
    }
  }
}

Optional MQTT: Set MQTT_ENABLED=true and configure MQTT_HOST to your MQTT broker IP for automation platform integration.

Install in VS Code (Local)

Install in VS Code

Add this to your VS Code MCP config file:

json
"mcp": {
  "servers": {
    "ddc-ci-bridge": {
      "type": "stdio",
      "command": "npx",
      "args": ["-y", "ddc-ci-control-bridge"],
      "env": {
        "MQTT_ENABLED": "false"
      }
    }
  }
}
Install in Claude Desktop (Local)

Open Claude Desktop developer settings and edit your claude_desktop_config.json file:

config.json
{
  "mcpServers": {
    "ddc-ci-bridge": {
      "command": "npx",
      "args": ["-y", "ddc-ci-control-bridge"],
      "env": {
        "MQTT_ENABLED": "false"
      }
    }
  }
}
Install in Claude Code (Local)

Run this command:

Terminal
claude mcp add ddc-ci-bridge -- npx -y ddc-ci-control-bridge
Install in Windsurf (Local)

Add this to your Windsurf MCP config file:

config.json
{
  "mcpServers": {
    "ddc-ci-bridge": {
      "command": "npx",
      "args": ["-y", "ddc-ci-control-bridge"],
      "env": {
        "MQTT_ENABLED": "false"
      }
    }
  }
}
Install in Cline (Local)

Add this to your Cline MCP configuration:

config.json
{
  "mcpServers": {
    "ddc-ci-bridge": {
      "command": "npx",
      "args": ["-y", "ddc-ci-control-bridge"],
      "env": {
        "MQTT_ENABLED": "false"
      }
    }
  }
}
Install in Zed (Local)

Add this to your Zed settings.json:

config.json
{
  "context_servers": {
    "DDC/CI Bridge": {
      "source": "custom",
      "command": "npx",
      "args": ["-y", "ddc-ci-control-bridge"],
      "env": {
        "MQTT_ENABLED": "false"
      }
    }
  }
}
Install in Roo Code (Local)

Add this to your Roo Code MCP configuration:

config.json
{
  "mcpServers": {
    "ddc-ci-bridge": {
      "command": "npx",
      "args": ["-y", "ddc-ci-control-bridge"],
      "env": {
        "MQTT_ENABLED": "false"
      }
    }
  }
}
Install in Augment Code (Local)

Option A: Using the UI

  1. Click the hamburger menu
  2. Select Settings
  3. Navigate to Tools section
  4. Click + Add MCP button
  5. Enter command: npx -y ddc-ci-control-bridge
  6. Name: DDC/CI Bridge
  7. Click Add

Option B: Manual Configuration

Add to settings.json:

json
"augment.advanced": {
  "mcpServers": [
    {
      "name": "ddc-ci-bridge",
      "command": "npx",
      "args": ["-y", "ddc-ci-control-bridge"],
      "env": {
        "MQTT_ENABLED": "false"
      }
    }
  ]
}
Install in JetBrains AI Assistant (Local)
  1. Go to Settings β†’ Tools β†’ AI Assistant β†’ Model Context Protocol (MCP)
  2. Click + Add
  3. Select As JSON from the dropdown
  4. Add this configuration:
config.json
{
  "mcpServers": {
    "ddc-ci-bridge": {
      "command": "npx",
      "args": ["-y", "ddc-ci-control-bridge"],
      "env": {
        "MQTT_ENABLED": "false"
      }
    }
  }
}
  1. Click Apply to save changes
Install in Warp (Local)
  1. Navigate Settings β†’ AI β†’ Manage MCP servers
  2. Click + Add button
  3. Paste this configuration:
config.json
{
  "DDC/CI Bridge": {
    "command": "npx",
    "args": ["-y", "ddc-ci-control-bridge"],
    "env": {
      "FASTMCP_API_KEY": "your-api-key-here",
      "MQTT_ENABLED": "false"
    },
    "working_directory": null,
    "start_on_launch": true
  }
}
  1. Click Save
Install in OpenAI Codex (Local)

Add to your Codex MCP configuration:

toml
[mcp_servers.ddc-ci-bridge]
command = "npx"
args = ["-y", "ddc-ci-control-bridge"]

[mcp_servers.ddc-ci-bridge.env]
MQTT_ENABLED = "false"

Windows Users: Use full paths if you encounter timeout errors:

toml
[mcp_servers.ddc-ci-bridge]
command = "cmd"
args = ["/c", "npx", "-y", "ddc-ci-control-bridge"]
startup_timeout_ms = 20_000

[mcp_servers.ddc-ci-bridge.env]
SystemRoot = "C:\\Windows"
FASTMCP_API_KEY = "your-api-key-here"
MQTT_ENABLED = "false"
Install in LM Studio (Local)
  1. Navigate to Program (right side) β†’ Install β†’ Edit mcp.json
  2. Add this configuration:
config.json
{
  "mcpServers": {
    "DDC/CI Bridge": {
      "command": "npx",
      "args": ["-y", "ddc-ci-control-bridge"],
      "env": {
        "MQTT_ENABLED": "false"
      }
    }
  }
}
  1. Click Save
  2. Toggle the MCP server on/off from the right side panel
Install in Qodo Gen (Local)
  1. Open Qodo Gen chat panel in VSCode or IntelliJ
  2. Click Connect more tools
  3. Click + Add new MCP
  4. Add this configuration:
config.json
{
  "mcpServers": {
    "ddc-ci-bridge": {
      "command": "npx",
      "args": ["-y", "ddc-ci-control-bridge"],
      "env": {
        "MQTT_ENABLED": "false"
      }
    }
  }
}
Install in Perplexity Desktop (Local)
  1. Navigate Perplexity β†’ Settings
  2. Select Connectors
  3. Click Add Connector
  4. Select Advanced
  5. Enter Server Name: DDC/CI Bridge
  6. Paste this JSON:
config.json
{
  "command": "npx",
  "args": ["-y", "ddc-ci-control-bridge"],
  "env": {
    "FASTMCP_API_KEY": "your-api-key-here",
    "MQTT_ENABLED": "false"
  }
}
  1. Click Save
Install in Kiro (Local)
  1. Navigate Kiro β†’ MCP Servers
  2. Click + Add button
  3. Paste this configuration:
config.json
{
  "mcpServers": {
    "DDC/CI Bridge": {
      "command": "npx",
      "args": ["-y", "ddc-ci-control-bridge"],
      "env": {
        "MQTT_ENABLED": "false"
      },
      "disabled": false,
      "autoApprove": []
    }
  }
}
  1. Click Save
Install in BoltAI (Local)
  1. Open Settings β†’ Plugins
  2. Enter this JSON:
config.json
{
  "mcpServers": {
    "ddc-ci-bridge": {
      "command": "npx",
      "args": ["-y", "ddc-ci-control-bridge"],
      "env": {
        "MQTT_ENABLED": "false"
      }
    }
  }
}
  1. Save and restart if needed
Install in Zencoder (Local)
  1. Go to Zencoder menu (...)
  2. Select Agent tools
  3. Click Add custom MCP
  4. Add name and server configuration:
config.json
{
  "command": "npx",
  "args": ["-y", "ddc-ci-control-bridge"],
  "env": {
    "FASTMCP_API_KEY": "your-api-key-here",
    "MQTT_ENABLED": "false"
  }
}
  1. Click Install
Install in Amazon Q Developer CLI (Local)

Add to your Amazon Q configuration:

config.json
{
  "mcpServers": {
    "ddc-ci-bridge": {
      "command": "npx",
      "args": ["-y", "ddc-ci-control-bridge"],
      "env": {
        "MQTT_ENABLED": "false"
      }
    }
  }
}
Using Bun or Deno

Bun:

config.json
{
  "mcpServers": {
    "ddc-ci-bridge": {
      "command": "bunx",
      "args": ["-y", "ddc-ci-control-bridge"],
      "env": {
        "MQTT_ENABLED": "false"
      }
    }
  }
}

Deno:

config.json
{
  "mcpServers": {
    "ddc-ci-bridge": {
      "command": "deno",
      "args": [
        "run",
        "--allow-env",
        "--allow-net",
        "npm:ddc-ci-control-bridge"
      ],
      "env": {
        "MQTT_ENABLED": "false"
      }
    }
  }
}
Windows-Specific Configuration

On Windows, use this format (example with Cline):

config.json
{
  "mcpServers": {
    "ddc-ci-bridge": {
      "command": "cmd",
      "args": ["/c", "npx", "-y", "ddc-ci-control-bridge"],
      "env": {
        "MQTT_ENABLED": "false"
      },
      "disabled": false,
      "autoApprove": []
    }
  }
}

🌐 Remote Setup (HTTP - Different Machines)

Use this if you want to access monitor controls from a different machine on your network.

Step 1: Set up the MCP Server on Monitor-Connected Machine
  1. On the machine with monitors, create a .env file:
bash
DDC_API_KEY=your-secure-random-api-key-here
MCP_TRANSPORT=sse
MCP_PORT=8000

# Optional: Enable MQTT for automation platforms
MQTT_ENABLED=false
MQTT_HOST=localhost
MQTT_PORT=1883
  1. Start the server:
Terminal
npm install -g ddc-ci-control-bridge
ddc-ci-bridge

Or using npx:

Terminal
npx ddc-ci-control-bridge
  1. The server will display:
Code
πŸ”Œ MCP Server: http://192.168.1.100:8000
   Transport: sse
   API Key: your-api...

Note the IP address and port for client configuration.

Step 2: Configure MCP Clients (Remote Connection)

Cursor:

config.json
{
  "mcpServers": {
    "ddc-ci-bridge": {
      "url": "http://192.168.1.100:8000",
      "headers": {
        "Authorization": "Bearer your-secure-random-api-key-here"
      }
    }
  }
}

VS Code:

json
"mcp": {
  "servers": {
    "ddc-ci-bridge": {
      "type": "http",
      "url": "http://192.168.1.100:8000",
      "headers": {
        "Authorization": "Bearer your-secure-random-api-key-here"
      }
    }
  }
}

Claude Desktop:

config.json
{
  "mcpServers": {
    "ddc-ci-bridge": {
      "url": "http://192.168.1.100:8000",
      "headers": {
        "Authorization": "Bearer your-secure-random-api-key-here"
      }
    }
  }
}

Windsurf:

config.json
{
  "mcpServers": {
    "ddc-ci-bridge": {
      "serverUrl": "http://192.168.1.100:8000",
      "headers": {
        "Authorization": "Bearer your-secure-random-api-key-here"
      }
    }
  }
}

Note: Replace 192.168.1.100 with the actual IP address of your monitor-connected machine, and use the same API key you configured in the server's .env file.


Configuration

  1. Create a .env file:
bash
cp .env.example .env
  1. Edit .env and configure:
bash
DDC_API_KEY=your-secret-api-key-here

# Enable MQTT for automation platforms (optional)
MQTT_ENABLED=false
MQTT_HOST=localhost
MQTT_PORT=1883

To enable MQTT: Set MQTT_ENABLED=true and change MQTT_HOST to your MQTT broker IP (e.g., Home Assistant IP).

  1. Start the server:
Terminal
npm run dev

MQTT Integration

This server acts as an MQTT client and can connect to any MQTT broker.

Supported Platforms

  • Home Assistant: Auto-discovery via MQTT Discovery Protocol β†’ See Home Assistant Guide
  • openHAB: MQTT binding with manual thing configuration
  • Node-RED: Subscribe to topics for custom flows
  • Domoticz: MQTT integration
  • Generic MQTT: Any platform that supports MQTT pub/sub

MQTT Topics

Code
ddc-monitor/{index}/brightness/set|get
ddc-monitor/{index}/contrast/set|get
ddc-monitor/{index}/vcp/{code}/set|get
ddc-monitor/{index}/power/set
ddc-monitor/{index}/state
ddc-monitor/bridge/status

MCP Resources

  • monitor://list - List all available monitors
  • monitor://{index}/capabilities - Full VCP code scan results
  • monitor://{index}/current-values - Current values of all supported codes
  • monitor://{index}/info - Monitor metadata

MCP Tools

  • get_vcp_code - Read a specific VCP code value
  • set_vcp_code - Write a value to a VCP code
  • get_brightness - Get monitor brightness (0-100)
  • set_brightness - Set monitor brightness (0-100)
  • refresh_monitors - Re-scan monitors and VCP capabilities

Development

Build

Terminal
npm run build

Build Executables

Terminal
npm run build:executables

This creates standalone executables in dist/bin/ for Windows, Linux, and macOS.

Run in Development

Terminal
npm run dev

Requirements

  • DDC/CI Support: Your monitor must support DDC/CI (most modern monitors do)
  • DDC/CI Enabled: Enable DDC/CI in your monitor's OSD settings
  • Permissions: On Linux, you may need to add your user to the i2c group

Linux Setup

bash
sudo usermod -a -G i2c $USER
sudo modprobe i2c-dev

Log out and log back in for group changes to take effect.

Environment Variables

See .env.example for all available configuration options.

Key variables:

  • DDC_API_KEY - API key for server authentication (required)
  • MCP_TRANSPORT - Transport type: sse or stdio (default: sse)
  • MCP_PORT - HTTP port for SSE transport (default: 8000)
  • MQTT_ENABLED - Enable MQTT client (default: false)
  • MQTT_HOST - MQTT broker IP/hostname (default: localhost)
  • MQTT_PORT - MQTT broker port (default: 1883)
  • MQTT_USERNAME - Auto-configured as ddc-mcp
  • MQTT_PASSWORD - Auto-configured from DDC_API_KEY

Architecture

Code
β”Œβ”€β”€β”€β”€β”€β”€β”€β”€β”€β”€β”€β”€β”€β”€β”€β”€β”€β”€β”€β”€β”€β”€β”€β”€β”€β”€β”€β”€β”€β”€β”€β”€β”€β”€β”€β”€β”€β”€β”€β”€β”€β”
β”‚       DDC/CI Control Bridge             β”‚
β”‚                                         β”‚
β”‚  β”Œβ”€β”€β”€β”€β”€β”€β”€β”€β”€β”€β”€β”€β”€β”€β”€β”€β”€β”  β”Œβ”€β”€β”€β”€β”€β”€β”€β”€β”€β”€β”€β”€β”€β”€β” β”‚
β”‚  β”‚  MCP Server     β”‚  β”‚ MQTT Client  β”‚ β”‚
β”‚  β”‚  - Resources    β”‚  β”‚ - Pub/Sub    β”‚ β”‚
β”‚  β”‚  - Tools        β”‚  β”‚ - Discovery  β”‚ β”‚
β”‚  β””β”€β”€β”€β”€β”€β”€β”€β”€β”¬β”€β”€β”€β”€β”€β”€β”€β”€β”˜  β””β”€β”€β”€β”€β”€β”€β”¬β”€β”€β”€β”€β”€β”€β”€β”˜ β”‚
β”‚           β”‚                  β”‚         β”‚
β”‚           β””β”€β”€β”€β”€β”€β”€β”€β”€β”¬β”€β”€β”€β”€β”€β”€β”€β”€β”€β”˜         β”‚
β”‚                    β”‚                   β”‚
β”‚           β”Œβ”€β”€β”€β”€β”€β”€β”€β”€β–Όβ”€β”€β”€β”€β”€β”€β”€β”€β”          β”‚
β”‚           β”‚ DDC Controller  β”‚          β”‚
β”‚           β”‚ - VCP Scanning  β”‚          β”‚
β”‚           β”‚ - Read/Write    β”‚          β”‚
β”‚           β””β”€β”€β”€β”€β”€β”€β”€β”€β”¬β”€β”€β”€β”€β”€β”€β”€β”€β”˜          β”‚
β””β”€β”€β”€β”€β”€β”€β”€β”€β”€β”€β”€β”€β”€β”€β”€β”€β”€β”€β”€β”€β”Όβ”€β”€β”€β”€β”€β”€β”€β”€β”€β”€β”€β”€β”€β”€β”€β”€β”€β”€β”€β”˜
                     β”‚
            β”Œβ”€β”€β”€β”€β”€β”€β”€β”€β–Όβ”€β”€β”€β”€β”€β”€β”€β”€β”
            β”‚ Physical Monitorβ”‚
            β”‚   (DDC/CI)      β”‚
            β””β”€β”€β”€β”€β”€β”€β”€β”€β”€β”€β”€β”€β”€β”€β”€β”€β”€β”˜

External Clients:
β”Œβ”€β”€β”€β”€β”€β”€β”€β”€β”€β”€β”€β”€β”€β”€β”  β”Œβ”€β”€β”€β”€β”€β”€β”€β”€β”€β”€β”€β”€β”€β”€β”  β”Œβ”€β”€β”€β”€β”€β”€β”€β”€β”€β”€β”€β”€β”€β”€β”
β”‚ AI Agents    β”‚  β”‚ MQTT Broker  β”‚  β”‚ Automation   β”‚
β”‚ (via MCP)    β”‚  β”‚ (any broker) β”‚  β”‚ Platforms    β”‚
β””β”€β”€β”€β”€β”€β”€β”€β”€β”€β”€β”€β”€β”€β”€β”˜  β””β”€β”€β”€β”€β”€β”€β”€β”€β”€β”€β”€β”€β”€β”€β”˜  β””β”€β”€β”€β”€β”€β”€β”€β”€β”€β”€β”€β”€β”€β”€β”˜

License

MIT

Documentation

  • Home Assistant Integration Guide - Complete HA setup
  • Development Guide - Technical architecture and development details

Contributing

Contributions welcome! Please open an issue or PR.

Troubleshooting

No monitors found

  • Ensure DDC/CI is enabled in your monitor's OSD settings
  • On Linux, check if i2c devices are available: ls -l /dev/i2c-*
  • Try running with elevated permissions (not recommended for production)

MQTT connection failed

  • Verify MQTT broker is running
  • Check credentials match the server output
  • Ensure firewall allows MQTT port (1883)

Commands not working

  • Check server logs for errors
  • Verify monitor supports the VCP code
  • Some codes may be read-only
  • Try restarting both server and Home Assistant

Related MCP Servers

View all in Home Automation View all alternatives
  • H
    Home Assistant Mcp

    Vibecode your Home Assistant setup from your IDE: automations, dashboards, themes and configs

    🏠 Home Automation0 views
    Compare vs Home Assistant Mcp β†’
  • Smartest Tv logoSmartest Tv

    Control any smart TV with natural language. Play Netflix, YouTube, Spotify by name with deep linking, cast URLs, scene presets, multi-room audio, and multi-TV sync. Supports LG, Samsung, Android TV, Roku. 21 MCP tools, no cloud required.

    🏠 Home Automation0 views
    Compare vs Smartest Tv β†’
  • Mockd logoMockd

    Multi-protocol API mock server with 18 MCP tools. Mock HTTP, GraphQL, gRPC, WebSocket, MQTT, SSE, and SOAP APIs with chaos engineering, stateful CRUD, 8 import formats (OpenAPI, Postman, HAR, WireMock, cURL, Mockoon, WSDL), and deterministic seeded responses.

    🏠 Home Automation2 views
    Compare vs Mockd β†’
  • Debmatic Mcp logoDebmatic Mcp

    Control a HomeMatic / debmatic CCU (eq-3 home automation) over its JSON-RPC and HM-Script APIs β€” switch and dim actuators, read sensors, system variables and service messages, run programs, and manage rooms, functions, channel links and device assignments. 25 tools over HTTP or stdio; runs locally against your own CCU.

    🏠 Home Automation1 views
    Compare vs Debmatic Mcp β†’

Frequently Asked Questions about CI Control Bridge

Add the following block to your claude_desktop_config.json under mcpServers: "mcpServers": { "ci-control-bridge": { "command": "npx", "args": ["-y", "DDC/CI Control Bridge"] } }

AllMCPs Directory Badge

Full Badge Customizer

Showcase your server listing on GitHub or your project documentation. Embed this dynamic SVG badge to highlight official listing status and live engagement.

Badge Style:
Live Dynamic SVG PreviewCI Control Bridge AllMCPs Directory Badge

Markdown (GitHub README)
[![AllMCPs](https://allmcps.com/api/badge/ddc-ci-control-bridge?style=directory)](https://allmcps.com/mcp/ddc-ci-control-bridge)
HTML Embed
<a href="https://allmcps.com/mcp/ddc-ci-control-bridge"><img src="https://allmcps.com/api/badge/ddc-ci-control-bridge?style=directory" alt="CI Control Bridge on AllMCPs" /></a>

Technical Specs & Signals

Category🏠Home Automation
More technical detailsExpand β–Ύ
TransportSTDIO
RuntimeNode.js
5/5 checks healthy over the last 6h
Views2
Unique ViewsTotal visits recorded for this listing page on AllMCPs.
Installs0
Installs & Copy ActionsTotal times users copied install commands or configuration snippets for this server.
GitHub stars5
GitHub Star CountTotal stargazers on GitHub representing community popularity (5 stars).
Last commit6mo ago
Last Repository CommitThe most recent commit or push recorded for this server's GitHub repository.Last commit on Feb 2, 2026
49Quality signal: Fair Β· 49/100How this signal is calculated β–Ύ
Server availabilityNot measured

Not scored for repo-hosted servers β€” we can't reach the running server, only its GitHub page. Hosted MCP endpoints are health-checked live.

Verified ownership10/20
Documentation & tools24/30
Adoption & activity2/15
Community engagement1/10

A guidance signal from public completeness & health data β€” not a user rating. New listings start lower and rise as they add docs, get verified, and grow adoption. Signals we can't observe for a listing are skipped, not counted against it.

β˜… Spotlight Slot

Feature Your MCP Server

Get maximum visibility for your server across our directory, search results, and detail pages.

Spotlight Your Server

Own this project?

This directory is pre-filled from public sources. Claim via GitHub README, site badge, or DNS TXT to get the verified badge and attach your website.

Free dofollow backlink: after claiming, verify your product site and place a dofollow AllMCPs badge β€” we recheck it stays live.

Claim & get free dofollow

Share & Embed

Add our SVG badge (dark/light directory styles) or embeddable widget to your site.

Explore more

More in 🏠 Home Automation β†’Alternatives to CI Control Bridge β†’Install in Claude DesktopInstall in CursorInstall in VS Code


