Cerno
A TUI tool for reviewing vulnerability scan findings and orchestrating security tools (nmap, NetExec, nuclei, custom commands). Import .nessus exports and nuclei results into a SQLite database for organized, persistent vulnerability verification and exploitation.
Key capabilities:
- 🔍 Interactive TUI for browsing/reviewing vulnerability findings — triage hundreds of findings fast
- 💾 SQLite-backed persistence — never lose review progress; track risk across scans
- ⚡ One-command tool launches (nmap NSE scripts, NetExec, nuclei, custom workflows) — no retyping targets
- 📊 CVE extraction, Metasploit module search, host comparison — go from finding to exploit path
- 🔗 NetExec database integration — see where your credentials already work
- 🤖 Claude Assistant — on-demand AI second opinion without leaving the TUI
- 🔀 Proxychains4 integration — route every tool through your pivot with one toggle
- 🔌 MCP server — drive an engagement from any MCP client (Claude CLI, etc.)
📺 Watch the demo:
Table of Contents
- Quick Start
- How It Works
- Architecture
- Installation
- Configuration · full reference
- Features
- Commands
- MCP Server (BETA)
- Keyboard Shortcuts
- Custom Workflows
- Troubleshooting
- Documentation
- Releases
- Contributing
- About the Name
- License
Quick Start
# Install with pipx (recommended)
pipx install git+https://github.com/ridgebackinfosec/cerno.git

# Import a Nessus scan
cerno import nessus scan.nessus

# ...or nuclei results (-je JSON or -jle/-jsonl)
cerno import nuclei nuclei.json

# Review findings interactively
cerno review
That's it! See Commands for more.
No scan file handy? Use the synthetic demo data included in this repo:
cerno demo
cerno review
That loads four scans — two Nessus and two nuclei — so both import paths are
covered. The nuclei scans target the same hosts the Nessus scans found, so at
the cerno review scan prompt you can select one of each (e.g. 2,4) and see
where the two scanners agree, and what only nuclei caught.
The demo fixtures use documentation-only IP ranges and .example hostnames.
See docs/demo for details.
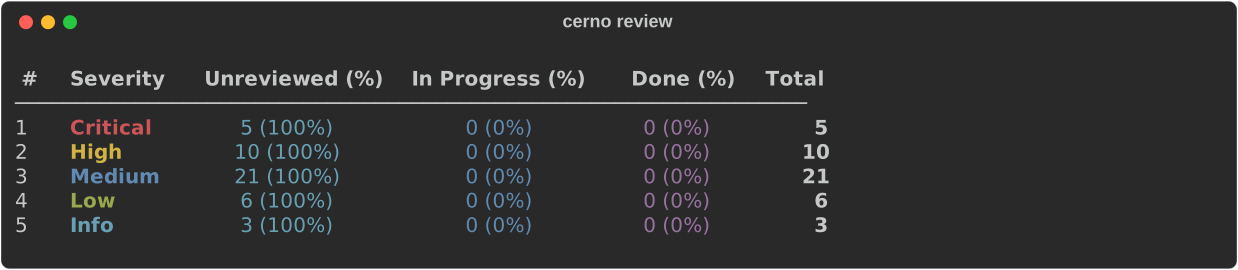
Start your review with an overview of findings by severity level
How It Works
Cerno turns raw scanner output — a Nessus export, nuclei results, or both — into a tracked, actionable verification workflow:

- Import — parse one or more
.nessusfiles, or nuclei JSON/JSONL results, into a local SQLite database (~/.cerno/cerno.db). Both sources share one review loop, and a multi-scan review can span them. - Review — browse findings in an interactive TUI: filter by severity, host, and exploitability; inspect finding detail, CVEs, and affected
host:ports. - Act — launch nmap / NetExec / nuclei / Metasploit / custom commands against the exact hosts and ports of a finding, with execution and artifacts logged automatically.
- Track — review state, sessions, and tool history persist in the database, so progress survives restarts and you can compare a host's risk across scans.
The same database and tooling are also exposed over the Model Context Protocol, so an MCP client (e.g. Claude CLI) can query findings and generate commands programmatically.
Installation
Requirements:
- Python 3.11+ on Linux or macOS (Linux recommended). Windows is best-effort and currently untested — parts of the MCP job runner rely on POSIX process groups
- Optional tools (only if you use them):
nmap,nxc/netexec,msfconsole,claude - Clipboard support on Linux:
xclip,xsel, orwl-copy
Recommended (pipx):
pipx install git+https://github.com/ridgebackinfosec/cerno.git
cerno --help
Alternative (pip):
pip install git+https://github.com/ridgebackinfosec/cerno.git
Development:
git clone https://github.com/ridgebackinfosec/cerno.git
cd cerno
pip install -e ".[dev]"
Shell completion:
cerno --install-completion # Enable tab completion for your shell
Configuration
All settings live in ~/.cerno/config.yaml, created with defaults on first run.
cerno config show                    # View all settings with current values
cerno config get <key>               # Get a single config value
cerno config set <key> <value>       # Change a setting
cerno config reset <key>             # Reset one setting to its default
cerno config reset                   # Reset to defaults (creates backup)
Terminal colors: colors are tuned for a light (white) terminal background by default. On a dark terminal, switch to the classic palette:
cerno config set color_scheme dark # light (default) | dark
Proxychains4 proxy settings:
cerno config set proxychains_enabled true        # Route tools through proxychains4 (default: false)
cerno config set proxychains_host 127.0.0.1      # proxychains4 SOCKS5 proxy host
cerno config set proxychains_port 9000           # proxychains4 SOCKS5 proxy port (matches ssh -D default)
All 36 settings, with defaults and notes on the ones that need them, are in the Configuration reference.
Features
🔍 Interactive TUI for browsing/reviewing vulnerability findings
Triage hundreds of findings fast — see what matters without scrolling through raw Nessus exports.
Rich tables with paged views, keyboard-driven navigation, and real-time filtering.
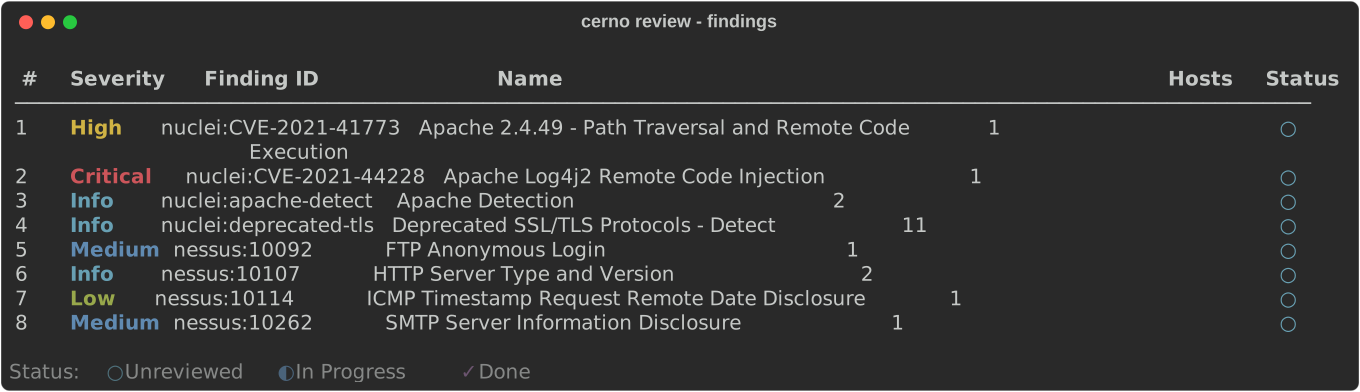
Browse findings from every imported scanner in one list — ids are namespaced by source
Key capabilities:
- Browse by severity, preview finding details, clipboard copy
- Grouped view (
host:port,port) or raw file view - Multi-select operations, reversible review states
📊 Intelligence & Research
Go from a finding to an exploitation path without context-switching — CVEs, Metasploit modules, and host overlap in one place.
Extract CVEs, search Metasploit modules, and compare findings across hosts.
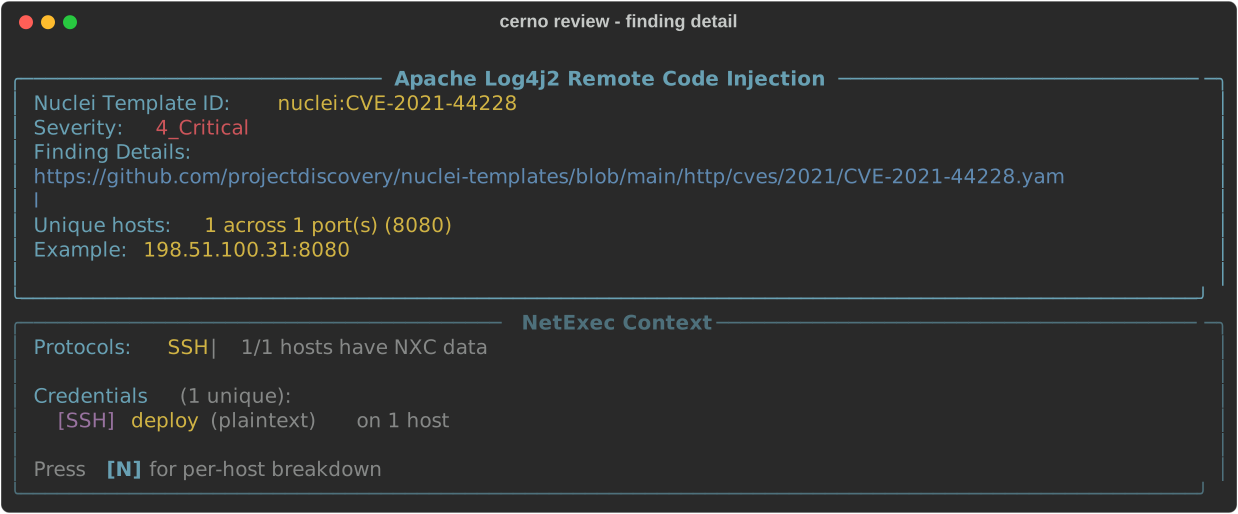
Finding details, with a source-aware identifier and a link to the plugin or template it came from
Features:
- CVE extraction - CVEs imported from .nessus file (press
[E]) - Metasploit search - Find relevant modules by CVE/description
- Workflow mappings - Finding-specific verification/exploitation steps (press
[W]) - Host comparison - Compare findings across hosts to find identical combinations and superset relationships
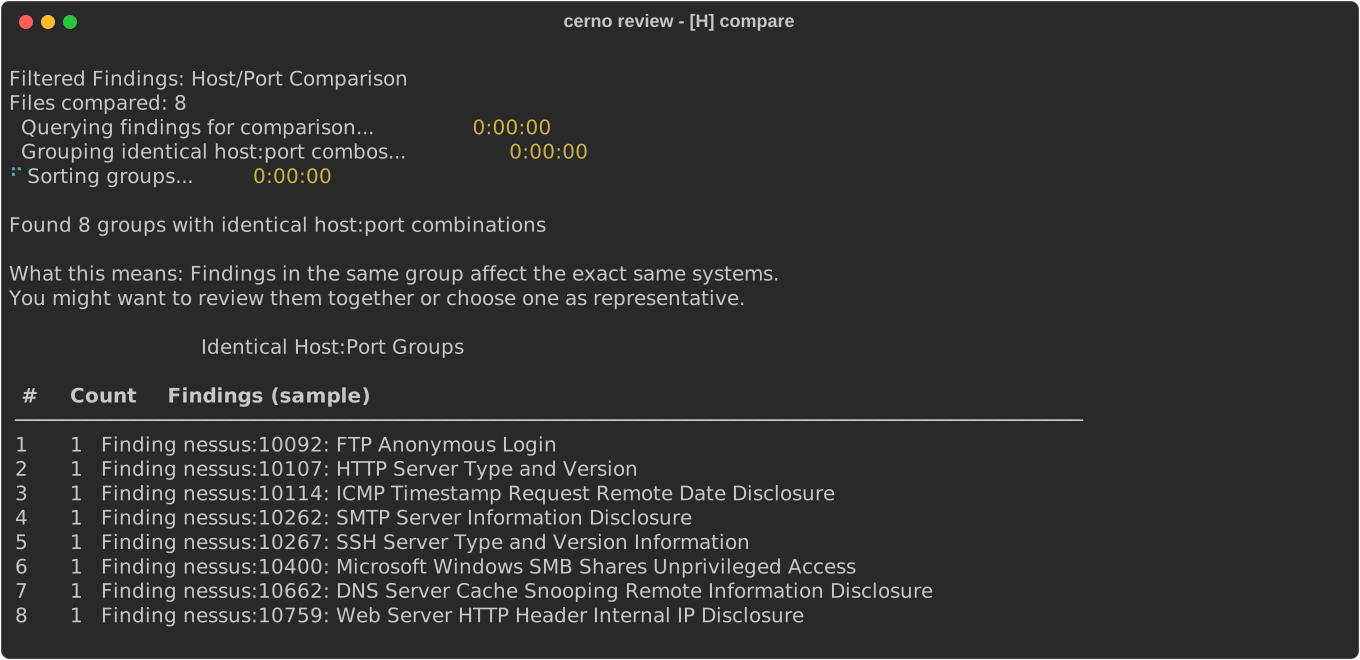
Compare findings to identify identical host:port combinations
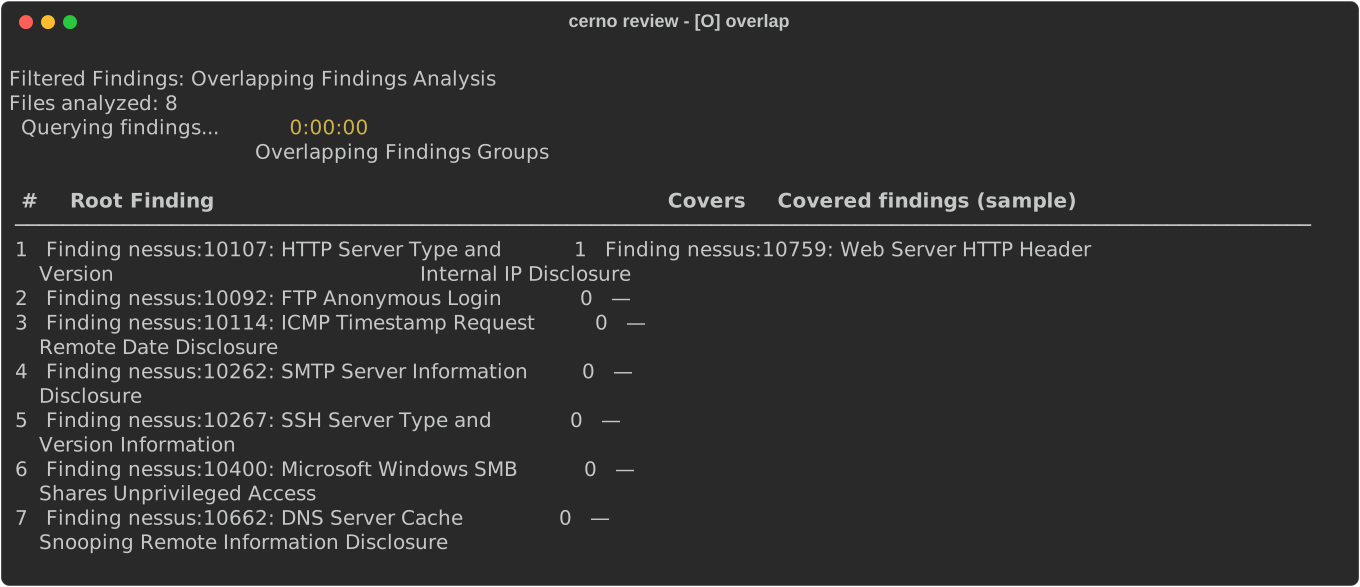
Analyze superset relationships to find which findings cover others
🤖 Claude Assistant
Get a second opinion on exploitability without leaving your review or copying scan data elsewhere.
Ask Claude questions about findings without leaving the TUI. Powered by the claude CLI (claude -p) — no API key required, no data sent to external services beyond what claude itself handles.
Three scopes:
- Finding level — press
[A]inside a finding detail view to discuss that specific finding: CVEs, CVSS context, exploitability, verification steps - Severity menu — press
[A]at the severity selection screen to discuss all findings across the selected scan(s) - Findings list — press
[A]in the findings list footer to discuss the current set of findings (respects any active severity, name, or group filter)
Conversation persistence: History is saved per-scope in SQLite and resumed automatically on re-entry. Inside the chat, Enter adds a new line, Alt+Enter (or Ctrl+J) sends, /clear clears history for the current scope, and Ctrl+C goes back.
Setup:
# Install Claude Code CLI (required)
npm install -g @anthropic-ai/claude-code   # or follow https://claude.ai/code

# Opt in (off by default). You can also just press [A] in review and confirm the prompt.
cerno config set claude_assistant_enabled true
Opt-in (default off): the assistant sends finding names, plugin metadata, affected hosts, ports, CVEs, workflow steps, and Nessus plugin output to the local claude CLI. Because that is sensitive engagement data, it is disabled by default. The first time you press [A] with claude installed, Cerno shows a data-path disclosure and, on confirmation, enables and remembers the choice. Enable it only if your engagement rules allow that data path.
Tool availability: [A] is hidden only when claude is not on PATH. When installed but not yet enabled, [A] is shown and triggers the one-time opt-in prompt.
Note: Responses may be inaccurate — always verify before acting on suggestions.
🔗 NetExec Database Integration
Instantly see where your credentials already work, so you prioritize provable risk over theoretical findings.
Automatically enrich finding displays with data from your NetExec databases—see which credentials work on affected hosts, share access, and security misconfigurations.
Features:
- Credential correlation - Shows which NetExec-discovered credentials have access to affected hosts
- Share access - Displays SMB share read/write permissions across hosts
- Security flags - Highlights SMB signing disabled, Zerologon, PetitPotam vulnerabilities
- Per-host breakdown - Press
[N]in finding view for detailed per-host NetExec context
Configuration:
# NetExec workspace auto-detected at ~/.nxc/workspaces/default/
cerno config set nxc_workspace_path ~/.nxc/workspaces/client_a  # Custom workspace
cerno config set nxc_enrichment_enabled false                    # Disable feature
Supported protocols: SMB, SSH, LDAP, MSSQL, RDP, WinRM, FTP, NFS, VNC, WMI
Note: NetExec databases are read in read-only mode; Cerno never modifies them.
⚡ One-command tool launches
Skip retyping targets — launch the right tool against the exact hosts and ports of a finding.
Launch nmap NSE scripts, NetExec, nuclei, Metasploit, or custom commands with placeholder substitution.
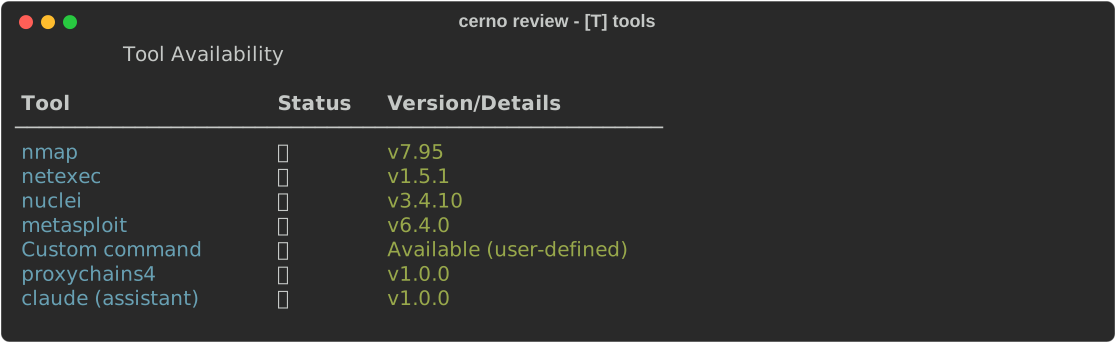
Launch nmap, NetExec, nuclei or Metasploit against a finding's hosts
Features:
- Launch nmap (NSE profiles, UDP), NetExec, nuclei, or custom commands
- Placeholder substitution for flexible templating
- Execution logging & artifact tracking
✅ Verification results & verdicts
Record what you actually proved, not just what Nessus claimed.
- Tool runs from the TUI and the MCP server are logged and attributed to their finding.
- Any logged nmap run (open ports, NSE vuln verdicts), nuclei run (template matches) or NetExec run, including TUI runs, can be ingested into structured results with the MCP
ingest_resultstool. MCP runs are ingested automatically when mutations are enabled. - Verdicts (
confirmed/false_positive/unable) are recorded with evidence, separately from review status. cerno creds listshows NetExec credential refs without secrets;cerno creds reveal <ref>prints one cleartext secret (audited).
Verdicts, ingestion and batch runs are driven through the MCP server.
💾 SQLite-backed persistence
Never lose review progress, and see how a host's risk profile changes over time.
Session Management:
- Auto-save/resume interrupted reviews
- Finding status: Unreviewed → In Progress → Done, moved with
[M]; Done findings are hidden until[D], where[M]moves them back to Unreviewed - Session statistics (duration, per-severity breakdown)
Database: SQLite-backed persistence at ~/.cerno/cerno.db tracks scans, findings, sessions, tool executions, and artifacts. Cross-scan tracking enables host history queries. See docs/DATABASE.md for schema details.
🔀 Proxychains4 Integration
Run every tool through your pivot with a single toggle — no per-command proxy fiddling.
Route all tool executions (nmap, NetExec, nuclei, Metasploit, custom commands) through a SOCKS5 proxy via proxychains4 (proxychains-ng). Designed for use with an SSH -D tunnel. Cerno always invokes the proxychains4 binary; the proxychains_* config key names are kept for compatibility and configure proxychains4.
Enable in config (persists across sessions):
cerno config set proxychains_enabled true        # Route tools through proxychains4
cerno config set proxychains_host 127.0.0.1      # proxychains4 SOCKS5 proxy host
cerno config set proxychains_port 9000           # Matches: ssh -D 9000 user@host
Proxy routing is config-only: the --proxy / --no-proxy session overrides
were removed, since a pivot lasts an engagement rather than a single command.
Toggle it with cerno config set proxychains_enabled true|false.
Behavior when active:
[PROXY]badge (magenta) shown in the review session status line- proxychains4 row appears in the startup tool availability table with the detected proxychains-ng version (e.g.
v4.17 · SOCKS5 127.0.0.1:9000 (active)) - Tools run as
proxychains4 -q(quiet) so per-connection chatter doesn't clutter the terminal; a magenta[PROXY] proxychains4 → SOCKS5 host:portline and aRunning via proxychains4spinner confirm routing - Set
cerno config set debug_logging trueto see full proxychains4 output when troubleshooting a tunnel - nmap automatically adds
-Pnand dropssudowhen proxied (ICMP and raw sockets don't traverse SOCKS) - Cerno manages its own
~/.cerno/proxychains4.conf— system config is not touched
Requires:
proxychains4installed and available on PATH.
Remote scan mode (pivot SYN scans): SOCKS can't carry raw-socket scans. In the nmap tool menu, [R] toggles remote mode: Cerno serves the target list over HTTPS on pivot_interface:pivot_http_port and gives you a curl … | nmap one-liner to run on the pivot host, plus an scp line to copy the results back into results_root.
🔌 MCP server (BETA)
Drive an engagement from an AI client — query findings, build target lists, and generate commands programmatically.
cerno mcp exposes the same scan database and tooling over the Model Context Protocol, so any MCP client (Claude CLI, Claude Desktop, etc.) can work with your findings. Read-only by default; execution and mutation are opt-in. See MCP Server (BETA) below for setup and the full capability reference.
Commands
# Import and review
cerno import nessus <scan.nessus>              # Import a single .nessus file
cerno import nessus <directory>                # Recursively import all .nessus files in a directory
cerno import nuclei <nuclei.json>              # Import nuclei results (-je array or -jle/-jsonl)
cerno import nuclei <f.json> --name webapp     # Override the scan name (defaults to the file stem)
cerno demo [--overwrite] [--no-nxc]            # Import the bundled demo scans (Nessus + nuclei) + NetExec workspace
cerno review                                   # Start interactive review (all behaviour from config.yaml)
cerno check                                    # Check external tool availability and exit

# Manage scans
cerno scan list                                # Compact summary (--json for scripting; scan_list_wide for all severities)
cerno scan delete <scan_name>
cerno scan compare <scan1> <scan2>             # Compare findings between two scans
cerno scan history <host_ip>                   # View vulnerability timeline for a host

# View workflows
cerno workflow list                            # Bundled + custom_workflows_path

# NetExec credentials (local only)
cerno creds list                               # Credential refs, usernames, domains (never secrets)
cerno creds reveal <ref>                       # Print one cleartext secret (SENSITIVE; audited)

# Configuration
cerno config show                              # Display all settings with current values
cerno config get <key>                         # Get a single config value
cerno config set <key> <value>                 # Set a config value
cerno config reset <key>                       # Reset one setting to its default
cerno config reset                             # Reset to defaults (creates backup)

# MCP server (BETA)
cerno mcp                                      # Serve scan data/tooling over MCP (stdio)

# Maintenance
cerno reset                                    # Purge ~/.cerno and return to fresh state
cerno --version                                # Show version
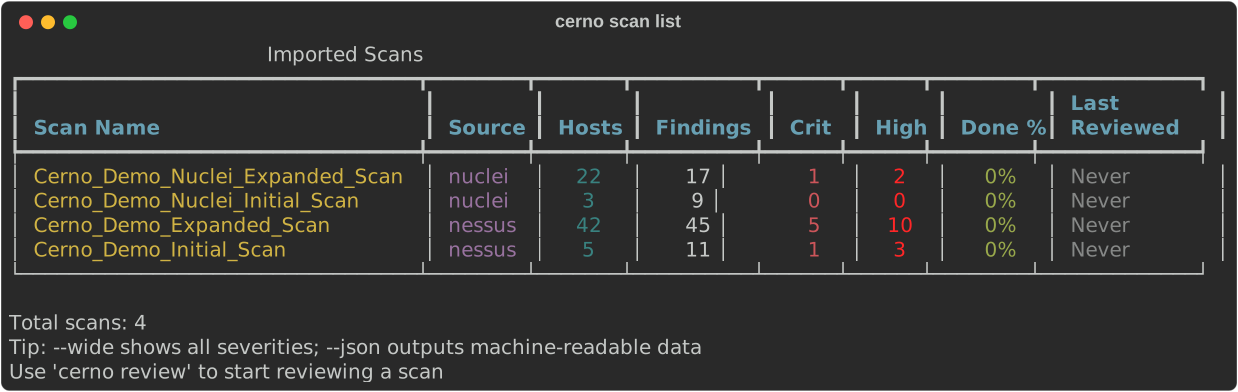
Every imported scan with the scanner it came from; scans from different sources are not comparable
MCP Server (BETA)
cerno mcp exposes your scan database and tooling over the Model Context Protocol,
so any MCP client (Claude CLI, Claude Desktop, etc.) can query findings, build target lists, generate
tool commands, and — when explicitly enabled — execute tools and update review state. It speaks over
stdio, so it is launched by the client rather than run directly in a terminal.
Add it to Claude CLI:
# pipx install (cerno is on PATH)
claude mcp add cerno -- cerno mcp

# development / editable install (point at your checkout's venv binary)
claude mcp add cerno -- /abs/path/to/cerno/.venv/bin/cerno mcp
Then claude mcp list to verify, or /mcp inside a session to see the tools,
resources, and prompts.
The server is read-only by default — execution and mutation tools stay hidden until you enable them:
cerno config set mcp_allow_execution true        # execute_command + background jobs
cerno config set mcp_allow_mutations true        # review state, notes, verdicts, ingest, import
cerno config set mcp_allow_batch true            # execute_batch over a query (also needs execution)
cerno config set mcp_allow_cred_injection true   # resolve @cred:<ref>@ placeholders at run time
cerno config set mcp_allow_cred_reveal true      # reveal_credential (cleartext; audited)
cerno config set mcp_exec_allowlist "nmap,nxc"   # restrict which binaries execute_command may run ("*" = any)
cerno config set mcp_exec_denylist "rm,dd,sh"    # binaries execute_command may never run (always wins)
Gating flags are read once at startup; reconnect (remove + re-add, or restart the client) to apply a change.
Even with execution enabled,
execute_commandonly runs binaries matchingmcp_exec_allowlist(default: nmap, nxc, netexec, msfconsole and nuclei, plus low-impact recon utilities such as curl, wget, dig, whois, ssh-audit, sslscan and snmpwalk; an empty list denies everything) and never runs binaries matchingmcp_exec_denylist(default: destructive commands such as rm, dd, mkfs*, shred, shutdown). Common wrapper prefixes (sudo,env,timeout,nice,nohup, …) are unwrapped so the real target is checked. The denylist is a guardrail, not a security boundary: with"*", shells and interpreters can still run denied programs unless you deny them too.
See docs/MCP.md for the full tool/resource/prompt reference, scopes, and management commands.
Keyboard Shortcuts
In the findings list view:
Enter- Open the first finding on the page; type a row number to open that finding[S]- Cycle sort modes (severity, finding ID, name, host count)[F]- Filter findings by text (finding name, description, etc.)[I]- Toggle In Progress only / all statuses[C]- Clear active text and status filters[V]- View all unique hosts across the filtered findings[H]- Compare: group findings by identical host:port combinations (when a group has more than 8 findings, answerDat the prompt to page through every group)[O]- Overlapping: find findings whose affected hosts are a superset of another's[X]- Clear group filter (when a comparison/overlap group is active)[E]- Extract CVEs for all findings matching current filter[M]- Move to next status: every filtered finding moves one step (Unreviewed → In Progress, In Progress → Done)[D]- Done only: show the Done findings in this same list, with every action available (sort, page, open,[V]/[W]/[T]/[A]).[M]there moves every shown finding back to Unreviewed[I]- In Progress only;[I]/[D]switch between each other, and[C]clears both- Status column:
○Unreviewed,◐In Progress,✓Done [A]- Ask Claude — chat about the current filtered findings set[N]/[P]- Next / previous page[B]- Back to severity menu[?]- Show help menu with all available actions
In the finding detail view:
[I]- Finding Info (finding metadata, CVSS, CVEs)[D]- Finding Details (host list, port distribution, captured output)[V]- View host(s) (groupedhost:portor raw list; copy to clipboard)[E]- CVE info for this finding[N]- NetExec Data (per-host credential and access breakdown)[T]- Run Tool (launch nmap, NetExec, nuclei, Metasploit, or custom workflow)[A]- Ask Claude — chat about this specific finding[W]- View workflow verification steps (when one is mapped)[M]- Move to In Progress / Move to Done (label follows the finding's status)[B]- Back to findings list
Custom Workflows
Add finding-specific verification workflows by pointing custom_workflows_path
at your YAML. By default it is merged over the bundled set (custom wins on
conflict); set custom_workflows_exclusive to use only your file, which is how
you test one in isolation:
cerno config set custom_workflows_path my_workflows.yaml
cerno workflow list                                  # confirm it loaded
cerno config set custom_workflows_exclusive true     # bundled set off
Example workflow YAML:
version: "1.0"
workflows:
  - finding_id: "nessus:57608"
    workflow_name: "SMB Signing Not Required"
    steps:
      - title: "Verify SMB signing"
        commands: ["netexec smb <TARGET> -u <USERNAME> -p <PASSWORD>"]
Workflow placeholders: <TARGET>, <PORT>, <USERNAME>, <PASSWORD>, <DOMAIN>, <INTERFACE>. Workflows are shown as reference steps in the TUI ([W]); the MCP prepare_workflow tool fills them in from the finding's hosts, ports and a chosen credential.
Custom command placeholders (the "Custom command" option in Run Tool, not workflows): {TCP_IPS}, {UDP_IPS}, {TCP_HOST_PORTS}, {PORTS}, {WORKDIR}, {RESULTS_DIR}, {OABASE}
Set custom_workflows_path in config to load your workflows by default (the MCP server uses it too).
For comprehensive documentation, see Custom Workflows Guide covering:
- Complete YAML schema reference
- Multi-finding workflows (one entry may cover findings from different scanners)
- Placeholder system details
- Configuration integration
- Best practices and troubleshooting
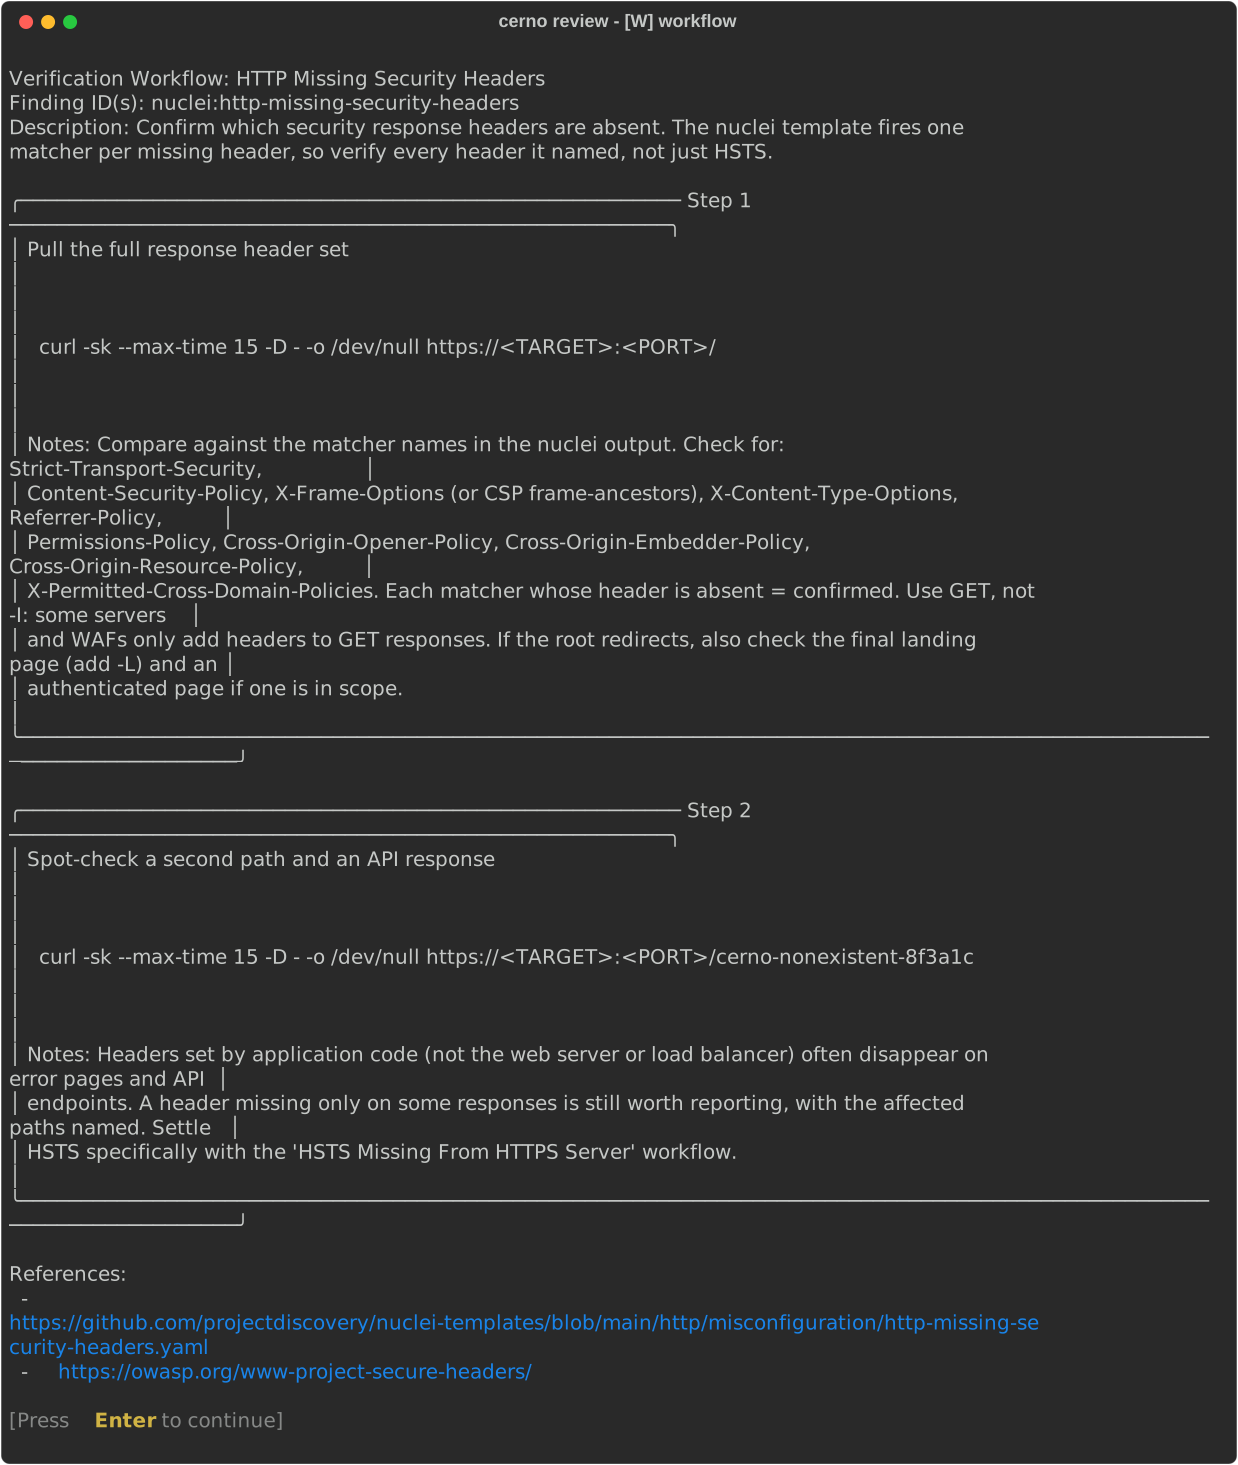
Verification workflows — one entry can cover the same issue found by two scanners
Troubleshooting
Database issues:
# Reset database (re-import required)
rm ~/.cerno/cerno.db
cerno import nessus scan.nessus
Config file issues:
# Reset a single setting to its default
cerno config reset <key>

# Reset config to defaults (creates backup)
cerno config reset
Full environment reset:
# Purge ~/.cerno entirely and return to a fresh installation state
cerno reset   # Prompts for typed confirmation before deleting
Import failures:
- Ensure the
.nessusfile is valid XML (not corrupted or truncated) - For nuclei, note that
-jebuffers results and writes once at exit, so an interrupted scan leaves no file;-jlestreams and survives interruption (Cerno imports either) - Check file permissions and path
- Turn on
cerno config set debug_logging trueand check~/.cerno/cerno.logfor the parse error
Tool execution issues:
- Verify tools (nmap, netexec) are installed and on PATH
- Check
~/.cerno/cerno.logfor detailed error messages
Documentation
- Architecture
- Configuration reference
- MCP server
- Custom workflows
- Database schema & queries
- Adding custom tools
- Tool system guide
- Error handling
- Demo data
- Contributing and Testing
Releases
Cerno uses automated releases triggered by version changes in pyproject.toml.
How it works:
- When
pyproject.tomlversion is updated and merged tomain, GitHub Actions automatically:- Creates a git tag (e.g.,
v1.0.1) - Generates a GitHub Release marked as "latest"
- Extracts release notes from CHANGELOG.md
- Attaches built wheel and source distribution
- Creates a git tag (e.g.,
View releases: github.com/ridgebackinfosec/cerno/releases
For contributors: To create a new release, update the version in pyproject.toml and add an entry to CHANGELOG.md following Keep a Changelog format. The release workflow runs automatically when changes are merged to main.
Contributing
Found a bug or have a feature request? Please open an issue at: github.com/ridgebackinfosec/cerno/issues
Pull requests are welcome. For major changes, please open an issue first to discuss.
Target the
developbranch — all contributor PRs should be opened againstdevelop, notmain. Releases flow fromdeveloptomain.
See CONTRIBUTING.md for dev setup, the test workflow, and the TUI ↔ MCP shared-core contract that keeps both interfaces working.
About the Name
Cerno comes from the Latin verb cernō, meaning:
- To discern, distinguish, perceive
- To separate, sift through
- To decide, determine, resolve
The name reflects this tool's core purpose: to help security professionals discern what matters in large vulnerability scans. Just as cernō means to sift through and distinguish the important from the noise, Cerno helps you:
- Discern which findings require immediate action vs. can be deferred
- Separate findings by severity, host, and exploitability
- Perceive patterns across hosts and identify verification paths
- Determine the most efficient approach to vulnerability validation
- Resolve findings through organized, tracked remediation workflows
In penetration testing and vulnerability management, clarity through careful examination is essential—that's Cerno.
Pronunciation: In Classical Latin, cerno is pronounced KEHR-noh (IPA: [ˈkɛr.noː])—the 'c' as a hard 'k' sound, the 'e' as in 'bed', and the 'o' as in 'no' (long). Audio sample
License
This tool orchestrates local utilities and includes Nessus XML parsing functionality adapted from DefensiveOrigins/NessusPluginHosts. Respect all dependencies' licenses and your organization's policies.