# attalla1/photopea-mcp-server [Health: Active]
**Category:** 🎨 Art & Culture
**Repository:** https://github.com/attalla1/photopea-mcp-server
**GitHub Stars:** 35
**npm Downloads (last month):** 388
**Views:** 2
**Installs:** 0
**Upvotes:** 0
**Directory Page:** https://allmcps.com/mcp/attalla1-photopea-mcp-server
## Description
AI-powered image editing through Photopea with 34 tools for documents, layers, text, shapes, filters, effects, and export. npx photopea-mcp-server
## Tools
Capabilities this server exposes over MCP:
- **photopea_create_document** — Create a new blank document and make it the active document. This is typically the first step in a workflow. The document opens with a Background layer. Use open_file instead to edit an existing image.
- **photopea_open_file** — Open an existing image file in Photopea as a new document. Supports PSD, PNG, JPG, WebP, SVG, and other common formats. The opened file becomes the active document. Use create_document instead to start with a blank canvas.
- **photopea_get_document_info** — Get metadata about the active document including name, width, height, resolution (DPI), layer count, and color mode. Returns JSON. Use this to check document dimensions before positioning layers or making selections.
- **photopea_resize_document** — Resize the active document canvas to new pixel dimensions, resampling all layer content to fit. This is a destructive operation — all layers are scaled proportionally. Use undo to revert if needed.
- **photopea_close_document** — Close the active document. Set save to true to save changes before closing. Unsaved changes are discarded if save is false. The next open document becomes active, if any.
- **photopea_add_layer** — Add a new empty layer to the active document. The new layer becomes the active layer. Use this before operations that draw onto a layer, such as fill_selection or add_gradient.
- **photopea_add_fill_layer** — Add a non-destructive solid color fill layer that covers the entire canvas. Unlike fill_selection, this creates a separate adjustment-style layer that can be toggled, recolored, or deleted without affecting other layers. Use set_layer_properties to change its opacity or blend mode.
- **photopea_delete_layer** — Permanently remove a layer from the active document by name or index. The next layer in the stack becomes active after deletion. Use get_layers to see available layers before deleting.
- **photopea_select_layer** — Set a layer as the active layer by name or index. Many tools (apply_filter, apply_adjustment, fill_selection) operate on the active layer — use this to target a specific layer first. Use get_layers to find layer names and indices.
- **photopea_set_layer_properties** — Update one or more properties on a layer. Only specified properties are changed; others remain at their current values. Use get_layers to inspect current property values before modifying.
- **photopea_move_layer** — Translate a layer by a relative x/y offset in pixels from its current position. Positive x moves right, positive y moves down. Use get_layers to check current layer bounds, or transform_layer for scaling and rotation.
- **photopea_duplicate_layer** — Create a copy of a layer in the active document. The duplicate becomes the active layer and is placed above the original. Use newName to distinguish the copy from the original.
- **photopea_reorder_layer** — Move a layer to a new position in the layer stack. Use 'top' or 'bottom' to move to the ends of the stack, or 'above'/'below' to shift one position relative to the current index. Use get_layers to see the current layer order.
- **photopea_group_layers** — Group multiple layers into a layer group (folder). Layers are specified by name — use get_layers to find layer names. Grouped layers can be ungrouped later with ungroup_layers.
- **photopea_ungroup_layers** — Dissolve a layer group, moving all child layers to the document root. The group folder is removed but its contents are preserved. Use get_layers to find group names.
- **photopea_get_layers** — Get the full layer tree of the active document as JSON. Returns an array of layer objects with name, type, index, visible, opacity, blendMode, and bounds properties. Groups contain nested children arrays. Use this to discover layer names and indices for other layer operations.
- **photopea_add_text** — Add a new text layer to the active document at the specified position. The text layer becomes the active layer. Use paragraphBounds to create a text box with word wrapping, or omit for point text. Use load_font to add custom fonts, and list_fonts to find available font names.
- **photopea_edit_text** — Modify the content or style of an existing text layer. Only specified properties are changed — omit parameters to keep their current values. Use get_layers to find text layer names if needed.
- **photopea_add_shape** — Add a vector shape layer (rectangle or ellipse) to the active document. The shape layer becomes the active layer. Shapes are non-destructive and can be resized with transform_layer without quality loss.
- **photopea_place_image** — Place an image into the active document from a URL or local file path. Creates a new layer with the placed image as the active layer. Use width/height to resize while preserving aspect ratio, or x/y to position the layer.
- **photopea_apply_adjustment** — Apply a destructive image adjustment to the active layer's pixel data. Use select_layer to target a specific layer first. Modifies pixels directly — use undo to revert if needed.
- **photopea_apply_filter** — Apply a destructive filter effect to the active layer's pixel data. Use select_layer to target a specific layer first. Modifies pixels directly — use undo to revert if needed.
- **photopea_transform_layer** — Scale, rotate, or flip a layer in-place. Modifies the layer's pixel data destructively. Use get_layers to check current layer bounds before transforming, and undo to revert if needed.
- **photopea_add_gradient** — Apply a linear gradient fill to a layer, replacing its current pixel content. The target layer must already exist — use add_layer to create one first. Colors are distributed evenly across the gradient.
- **photopea_make_selection** — Create a pixel selection region in the active document. After creating a selection, use fill_selection to fill it with color, or clear_selection to deselect. Use type 'all' to select the entire canvas, or 'rect'/'ellipse' with bounds for a specific region.
- **photopea_modify_selection** — Modify the current active selection. Requires an existing selection created by make_selection. For expand, contract, and feather, the amount parameter specifies pixels. Invert swaps selected and unselected areas.
- **photopea_fill_selection** — Fill the current selection with a solid color on the active layer. Requires an active selection — use make_selection to create one first. Modifies pixel data on the active layer directly. Use clear_selection afterward to deselect.
- **photopea_clear_selection** — Deselect the current selection in the active document, removing the marching ants. Does not modify any pixel data. Use after fill_selection or other selection-based operations are complete.
- **photopea_export_image** — Export the active document to a file and save it to the local filesystem. The entire document is flattened and exported in the chosen format. Use create_document or open_file to set up the document before exporting.
- **photopea_load_font** — Load a custom font from a URL (TTF, OTF, or WOFF2) into Photopea. The font becomes available for add_text and edit_text. Use list_fonts to find the PostScript name after loading.
- **photopea_list_fonts** — List available fonts in Photopea. Returns font PostScript names that can be used with add_text and edit_text.
- **photopea_run_script** — Execute arbitrary Photopea/ExtendScript JavaScript in the Photopea environment. Use this for advanced operations not covered by other tools. Has full access to the Photopea DOM (app, activeDocument, layers). Use with caution — scripts can modify or delete any document data.
- **photopea_undo** — Undo one or more recent actions in the active document. Each step reverses one operation from the history. Use after destructive operations (apply_filter, apply_adjustment, fill_selection) to revert changes.
- **photopea_redo** — Redo one or more previously undone actions in the active document. Only available after using undo — the redo history is cleared when new actions are performed.
## Claude Desktop Quick Installation
Install path detected from listing signals. Uses `npx` (confidence: high):
```json
"mcpServers": {
"photopea-mcp-server": {
"command": "npx",
"args": ["-y","photopea-mcp-server"]
}
}
```
## Documentation & README

Photopea MCP Server
Design posters, edit photos, and transform images directly from your terminal. Powered by Photopea -- a free, browser-based alternative to Photoshop -- connected to your AI agent via MCP.



## Demo
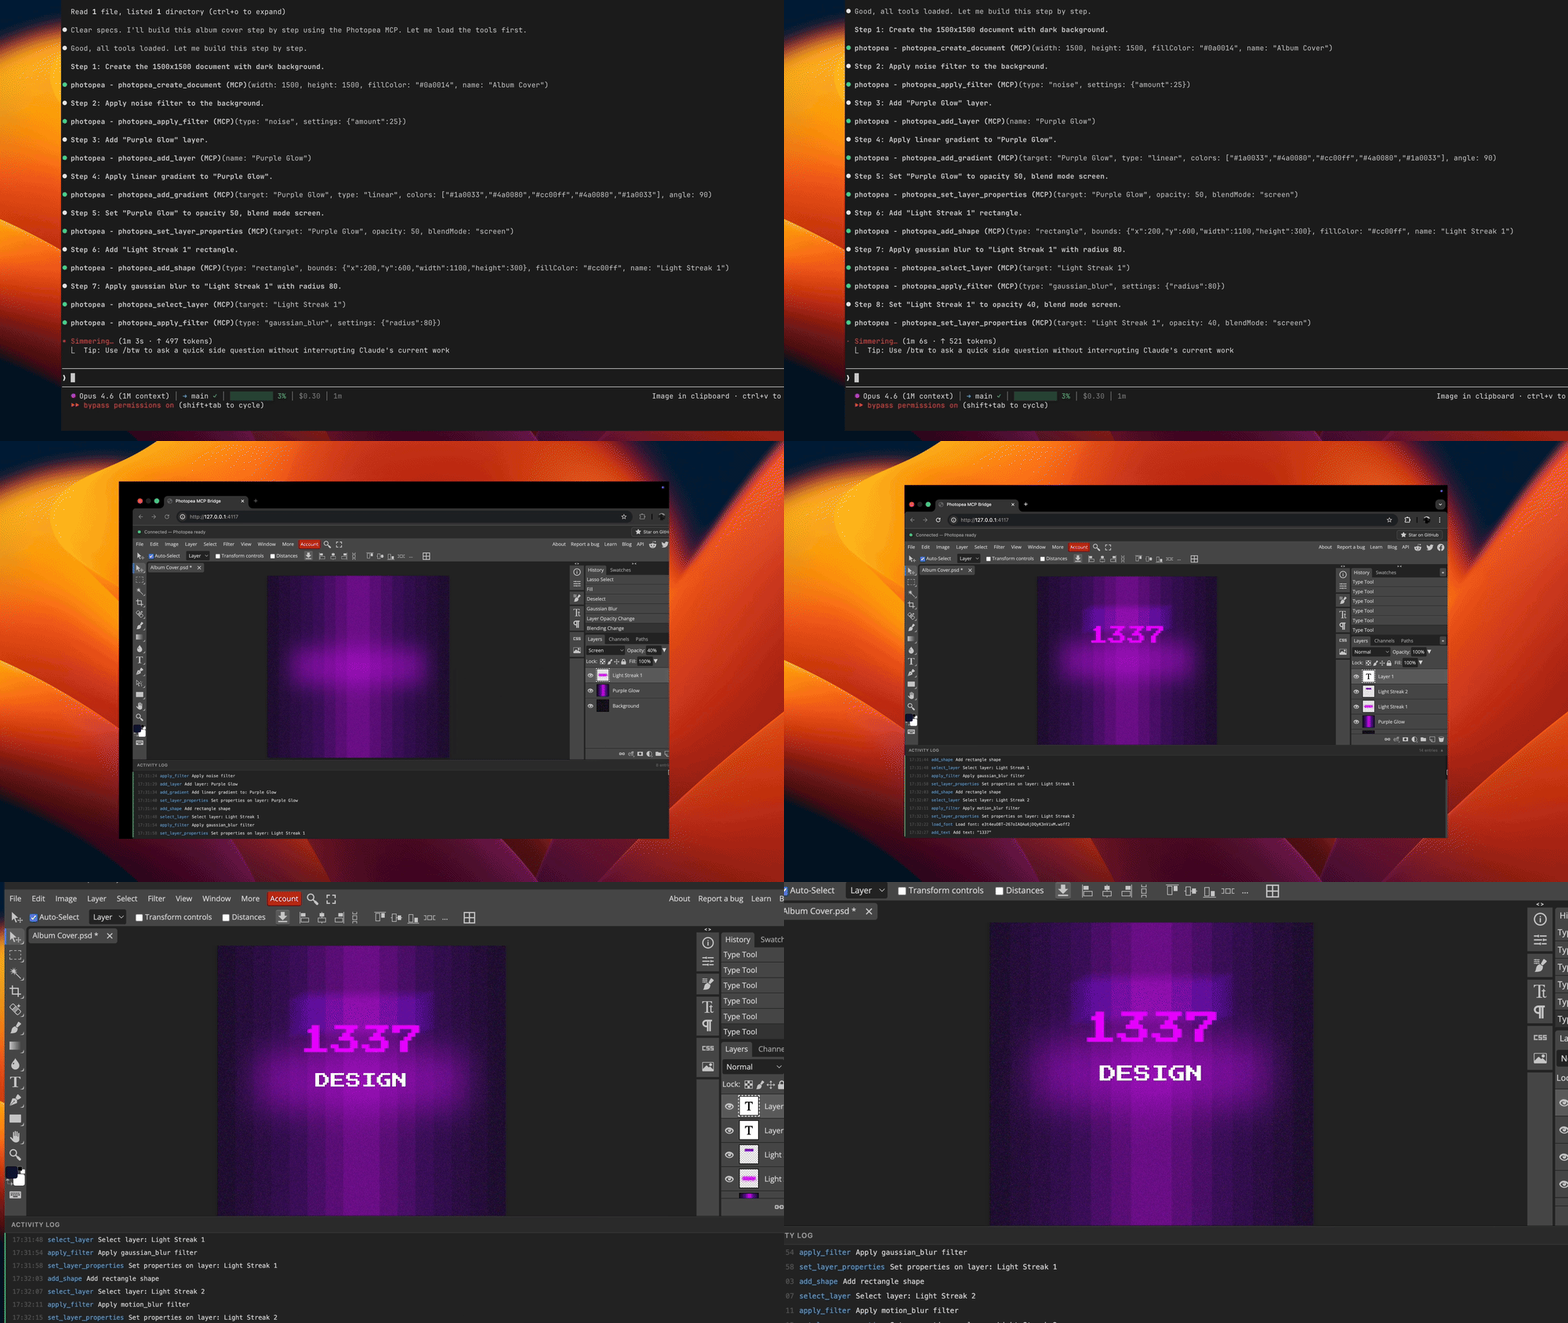
Prompt used in this demo: examples/album-cover-demo.md
## How It Works
```mermaid
graph LR
A[Agent] <-->|stdio| B[MCP Server]
B <-->|WebSocket| C[Browser]
C <-->|postMessage| D[Photopea]
```
Your agent sends editing commands through the MCP protocol. The server translates these into Photopea JavaScript API calls and executes them via a WebSocket bridge to the browser.
**Note:** A browser window will open automatically on the first tool call. This is expected -- Photopea runs entirely in the browser and the server needs it to perform image editing operations.
## Quick Start
```bash
claude mcp add -s user photopea -- npx -y photopea-mcp-server
```
Then start a new Claude Code session and ask it to edit images. The Photopea editor will open in your browser automatically on the first tool call.
## Installation
### Claude Code
**npx (recommended):**
```bash
claude mcp add -s user photopea -- npx -y photopea-mcp-server
```
**Global install:**
```bash
npm install -g photopea-mcp-server
claude mcp add -s user photopea -- photopea-mcp-server
```
### Claude Desktop
Add to your Claude Desktop config file (`~/Library/Application Support/Claude/claude_desktop_config.json` on macOS):
```json
{
"mcpServers": {
"photopea": {
"command": "npx",
"args": ["-y", "photopea-mcp-server"]
}
}
}
```
### Cursor
Add to Cursor MCP settings (`.cursor/mcp.json` in your project or `~/.cursor/mcp.json` globally):
```json
{
"mcpServers": {
"photopea": {
"command": "npx",
"args": ["-y", "photopea-mcp-server"]
}
}
}
```
### VS Code (Copilot)
Add to `.vscode/mcp.json` in your project:
```json
{
"servers": {
"photopea": {
"command": "npx",
"args": ["-y", "photopea-mcp-server"]
}
}
}
```
### Windsurf
Add to Windsurf MCP settings (`~/.windsurf/mcp.json`):
```json
{
"mcpServers": {
"photopea": {
"command": "npx",
"args": ["-y", "photopea-mcp-server"]
}
}
}
```
## Available Tools
### Document (5 tools)
| Tool | Description |
|------|-------------|
| `photopea_create_document` | Create a new document with specified dimensions and settings |
| `photopea_open_file` | Open an image from a URL or local file path |
| `photopea_get_document_info` | Get active document info (name, dimensions, resolution, color mode) |
| `photopea_resize_document` | Resize the active document (resamples content to fit) |
| `photopea_close_document` | Close the active document |
### Layer (11 tools)
| Tool | Description |
|------|-------------|
| `photopea_add_layer` | Add a new empty art layer |
| `photopea_add_fill_layer` | Add a solid color fill layer |
| `photopea_delete_layer` | Delete a layer by name or index |
| `photopea_select_layer` | Make a layer active by name or index |
| `photopea_set_layer_properties` | Set opacity, blend mode, visibility, name, or lock state |
| `photopea_move_layer` | Translate a layer by x/y offset |
| `photopea_duplicate_layer` | Duplicate a layer with optional new name |
| `photopea_reorder_layer` | Move a layer in the stack (above, below, top, bottom) |
| `photopea_group_layers` | Group named layers into a layer group |
| `photopea_ungroup_layers` | Ungroup a layer group |
| `photopea_get_layers` | Get the full layer tree as JSON |
### Text & Shape (3 tools)
| Tool | Description |
|------|-------------|
| `photopea_add_text` | Add a text layer at specified coordinates |
| `photopea_edit_text` | Edit content or style of an existing text layer |
| `photopea_add_shape` | Add a shape (rectangle or ellipse) |
### Image & Effects (9 tools)
| Tool | Description |
|------|-------------|
| `photopea_place_image` | Place an image from URL or local path |
| `photopea_apply_adjustment` | Apply brightness/contrast, hue/saturation, levels, or curves |
| `photopea_apply_filter` | Apply gaussian blur, sharpen, unsharp mask, noise, or motion blur |
| `photopea_transform_layer` | Scale, rotate, or flip a layer |
| `photopea_add_gradient` | Apply a linear gradient fill |
| `photopea_make_selection` | Create a rectangular, elliptical, or full selection |
| `photopea_modify_selection` | Expand, contract, feather, or invert a selection |
| `photopea_fill_selection` | Fill the current selection with a color |
| `photopea_clear_selection` | Deselect the current selection |
### Export & Utility (6 tools)
| Tool | Description |
|------|-------------|
| `photopea_export_image` | Export to PNG, JPG, WebP, PSD, or SVG |
| `photopea_load_font` | Load a custom font from a URL (TTF, OTF, WOFF2) |
| `photopea_list_fonts` | List available fonts, with optional search filter |
| `photopea_run_script` | Execute arbitrary Photopea JavaScript |
| `photopea_undo` | Undo one or more actions |
| `photopea_redo` | Redo one or more actions |
## Usage Examples
Once installed, ask your agent to perform image editing tasks:
**Create a poster:**
> "Create a 1920x1080 document with a dark blue background, add the title 'Hello World' in white 72px Arial, and export it as a PNG to ~/Desktop/poster.png"
**Edit a photo:**
> "Open ~/photos/portrait.jpg, increase the brightness by 30, apply a slight gaussian blur of 2px, and export as JPG to ~/Desktop/edited.jpg"
**Composite images:**
> "Create a 1200x630 document, place ~/assets/background.png as the base layer, then place ~/assets/logo.png and move it to the top-right corner"
**Batch adjustments:**
> "Open ~/photos/sunset.jpg, apply hue/saturation with +20 saturation, apply an unsharp mask with amount 50 and radius 2, then export as PNG"
## Development
```bash
git clone https://github.com/attalla1/photopea-mcp-server.git
cd photopea-mcp-server
npm install
npm run build
```
### Commands
| Command | Description |
|---------|-------------|
| `npm run build` | Compile TypeScript to `dist/` |
| `npm run dev` | Watch mode with auto-reload |
| `npm test` | Run unit and integration tests |
| `npm start` | Start the server |
### Architecture
The server has four main components:
**MCP Server** (`src/server.ts`) -- Registers all 34 tools with the MCP SDK and connects via stdio transport.
**WebSocket Bridge** (`src/bridge/websocket-server.ts`) -- Manages the connection between the MCP server and the browser. Queues script execution requests and handles responses with timeouts.
**Script Builder** (`src/bridge/script-builder.ts`) -- Pure functions that translate tool parameters into Photopea JavaScript API calls. Each builder function generates a script string that Photopea can execute.
**Browser Frontend** (`src/frontend/index.html`) -- A single-page app that loads Photopea in an iframe, connects to the WebSocket bridge, and relays scripts to Photopea via `postMessage`. Returns results back through the WebSocket.
```
src/
index.ts # Entry point: HTTP server, browser launch, MCP startup
server.ts # MCP server initialization and tool registration
bridge/
websocket-server.ts # WebSocket bridge with request queue
script-builder.ts # Photopea JS code generators
types.ts # Protocol message types
tools/
document.ts # Document operations (5 tools)
layer.ts # Layer operations (11 tools)
text.ts # Text and shape operations (3 tools)
image.ts # Image, adjustment, filter operations (9 tools)
export.ts # Export and utility operations (6 tools)
utils/
file-io.ts # Local file read/write, URL fetching
platform.ts # Port discovery, browser launch
frontend/
index.html # Browser UI with Photopea iframe
```
## Security
- The MCP server binds to `127.0.0.1` (localhost only) and is not accessible from the network.
- The `photopea_run_script` tool executes arbitrary JavaScript inside Photopea's sandboxed iframe. It is marked as destructive and requires user approval in MCP clients that support tool annotations.
- File operations (`open_file`, `export_image`, `place_image`) read and write files with the same permissions as the user running the server.
## Known Limitations
- Heavy scripts (e.g., gradients with many color steps) may cause the Photopea browser UI to become unresponsive. The operations still complete successfully in the background and exports will work as expected.
- Refreshing the browser page will discard all unsaved work. Export your documents before refreshing.
- Only one browser tab should be open at a time. Multiple tabs will conflict over the WebSocket connection.
- The `reorder_layer` tool may cause the Photopea UI to become unresponsive. To avoid this, create layers in the desired order rather than reordering after creation.
## Requirements
- Node.js >= 18
- A modern web browser (Chrome, Firefox, Edge, Safari)
## License
MIT